Cheetah build
|
This page is where I will document the construction of the replica Cheetah car I will be building. I'll begin by explaining what a Cheetah is, why I wanted one and why I decided to build this particular car. Additional behind-the-scenes information about the build is included in the section called Tom's Ramblings.
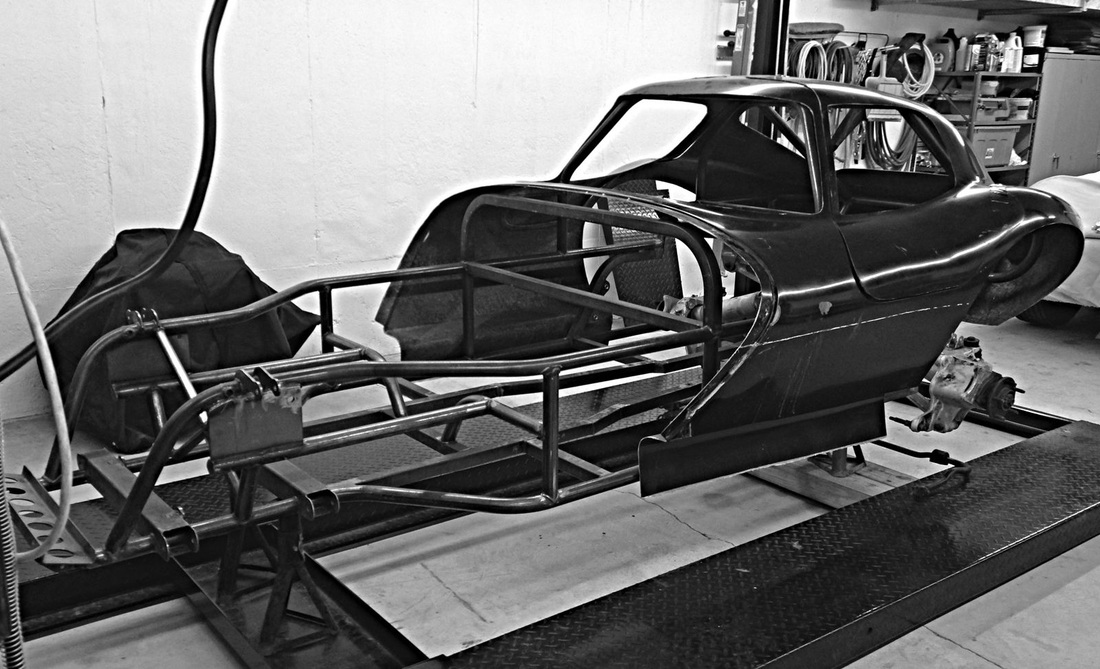
Note: This page was begun as work on the car began in 2016, so much of it is written in present tense. The car was completed in 2021. According to a Wikipedia article, the Cheetah was conceived in 1963 as a street and track car by Bill Thomas and Don Edmunds. It used Chevrolet drive train and suspension components in a custom chassis and body. About 23 cars were completed before a fire at the manufacturing facility and the evolving nature of car racing stopped the project. Bill Thomas, III remembers it differently: "Some of these myths about the Cheetah story, date clear back to 1964. There were only 11 original Cheetahs built, there was only 1 production run of 10 Cheetahs in addition to the first prototype car featured in the Nov. 1963 Sports Car Graphic magazine, totaling 11 original Cheetahs. March 1964 Hot Rod magazine quotes my Dad, announcing the production run of 10 Cheetahs at the end of the article, that was continued to the back of the magazine. This edition featured the very first car again, but closer to completion. '65Cheetahccc.com has the Hot rod article on site. The Cheetah story began as a clean sheet of paper design and build in approx. March of 1963, soon after the Grand Sport Corvette program was cancelled. Cheetah program was cancelled approx. May 1964, soon after the FIA increased the amount of of cars it required to be a production car, from 100 to 1000. Fire at the shop happened over a year later, over a year after the original Cheetah project ended. The shop was damaged not destroyed, we were back at work in that same building within 2 weeks. I was young, 10, but I was there. The Cheetah that every one knows is a 1964 Cheetah, built for the 1964 racing season. The 1964 Cheetah was a purpose built race car from its inception, the only reason that it was ever marketed as a street car was to try and get it homologated for the FIA, to be classified as a production car. The stories that the Cheetah was intended for anything other than racing, were probably intended to divert attention away from its real purpose. All original Cheetahs were produced with drum brakes, mainly because Chevrolet's disc brakes did not get development finished, until after the original Cheetah program ended. GM/Chevrolet were committed to a ventilated disc design that took longer that they hoped for, and that is why the 1963 Corvette Stingray and the 1964 Cheetah did not get their disc breaks, sadly to be sure. Dad already had at least a 3 to 4 year working relationship with GM/Chevrolet before they asked him to do the Cheetah project, I can assure you he would have never done it without their request and backing. It also explains why he stopped the program immediately, at their request." This article by Scott Oldham also explains a lot of the car's history: Hagarty Media article. And this version comes from lead fabricator Don Edmunds: Article Because so few Cheetah's were completed, and they were not widely replicated like Shelby Cobras, very few people have ever seen an original or replica Cheetah. They are most widely known by middle aged men as the most popular toy slot car from their youth. Popular opinion of sports car racing of the 1960s holds that the Shelby Cobras beat the Corvettes on the track because they weighed almost a thousand pounds less. It is also widely held that Bill Thomas got early support from some Chevrolet executives because the Cheetah was to be even lighter and quicker than the Shelby Cobra. The original Cheetahs were several hundred pounds lighter than Cobras of that era, but they didn't get the chassis and suspension systems worked out before the project ended. To me, who got his driver's license in 1963, the Corvette, Cobra and Cheetah marked the evolution of the front engine, rear wheel drive American sports car. Each was more extreme than the one before. So as I already owned a 1963 Corvette and a replica of a Shelby Cobra, it just seemed natural to want a Cheetah to finish out the set. I began a daily search for a Cheetah I could afford and looked for several years before I happened on the right car. (Update May 2017: I sold the Shelby Cobra replica.) To my knowledge there are several places that sell reproduction Cheetah fiberglass bodies, but only three that sell kits or completed cars. One company in Arizona used to sell the "continuation" Cheetah approved by the now deceased Bill Thomas. It has stopped production. Another kit is sold by a man who builds the frame and body himself in his shop. His products are said to be strong and well made, but aside from the body and frame, it is entirely up to the buyer to acquire and/or fabricate everything else needed to complete the car. The third company that sold Cheetah kits was based in Ohio. This car was inspired by the Cheetah but is not a true replica. The chassis uses suspension components from a C4 Corvette making it wider than the original Cheetahs. To keep the body proportions close, the overall car is slightly larger and heavier than the originals. But the handling is better than the originals and it can accept any common engine and transmission combination. I decided to go with a modern version of a traditional small block Chevy engine backed by a T56 Magnum six-speed transmission. The parts I bought came from the Ohio company before it stopped production and were sold to a man in Minnesota in 2013. He intended to build it into a dedicated race car. The kit sat untouched until I bought it in 2015. This is the car as it was offered for sale. 
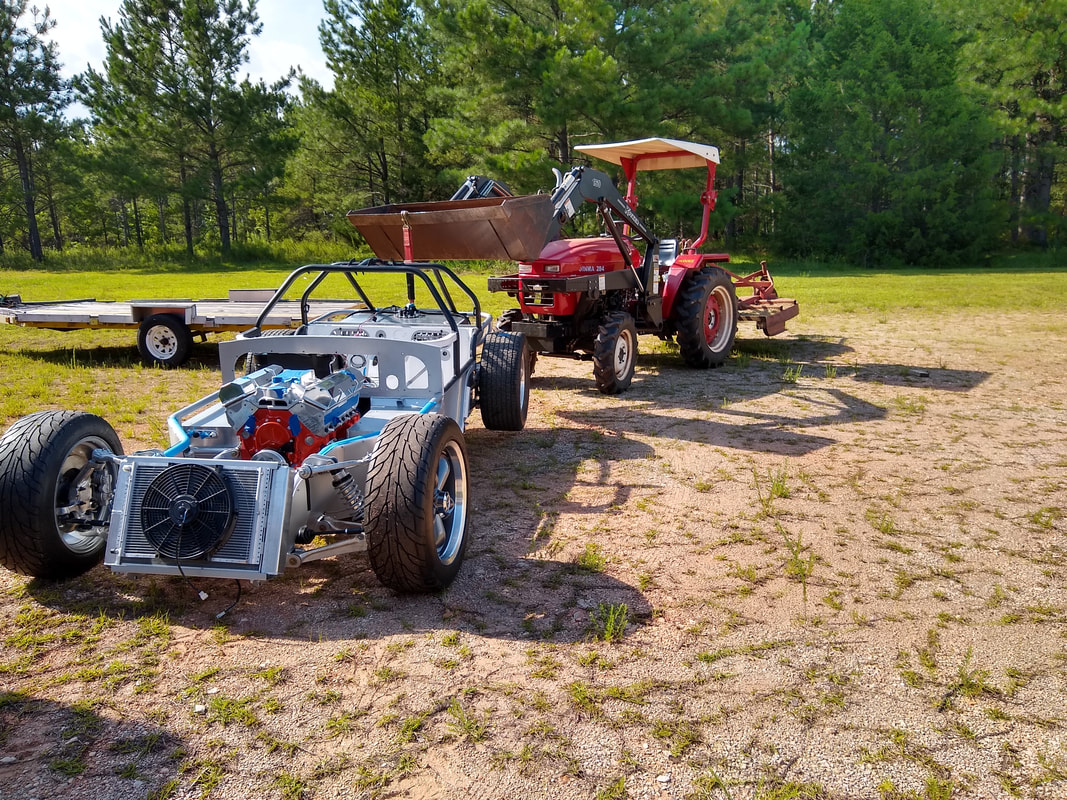
Plainly, this is going to be a big project that will take time, money and persistence. The good news is that parts to complete this car were still available at the time. My goal is to have it completed while I'm still flexible enough to get in and out of it.
|
|
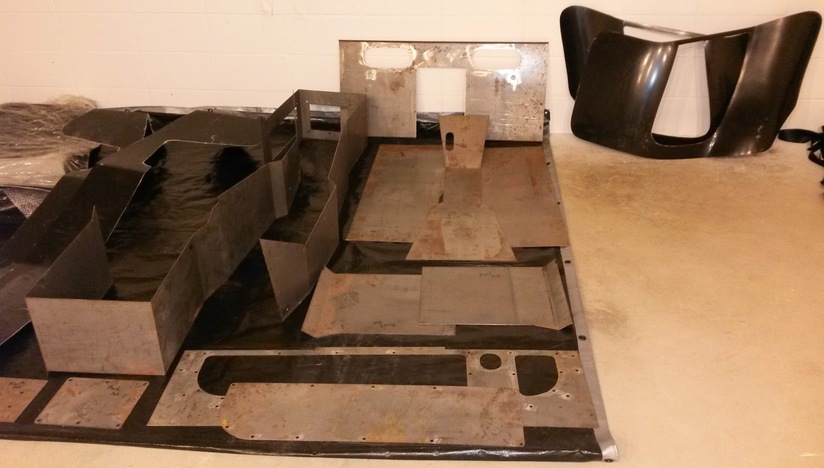
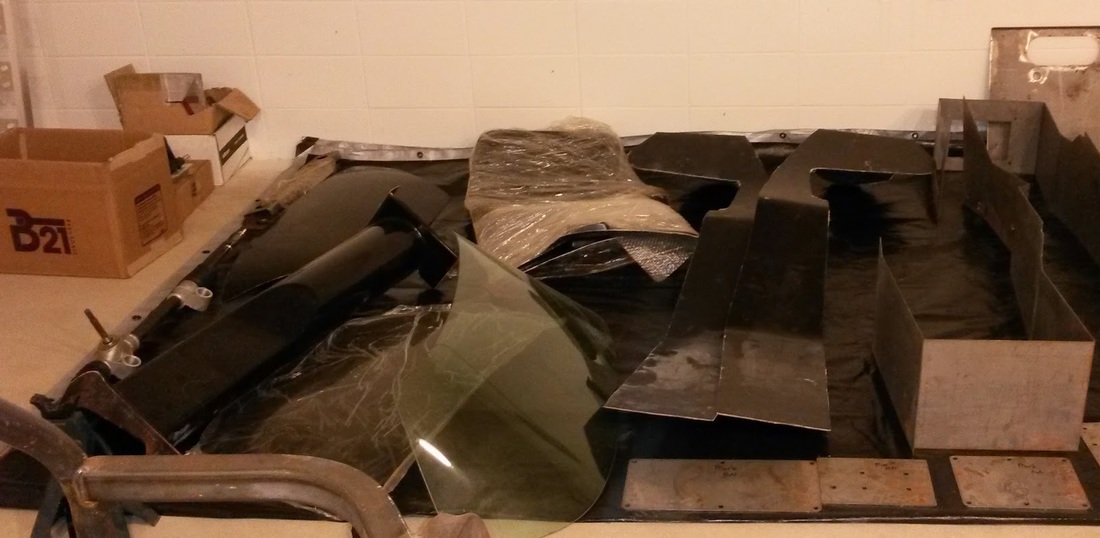
Here is the car as its many pieces arrived in my garage.
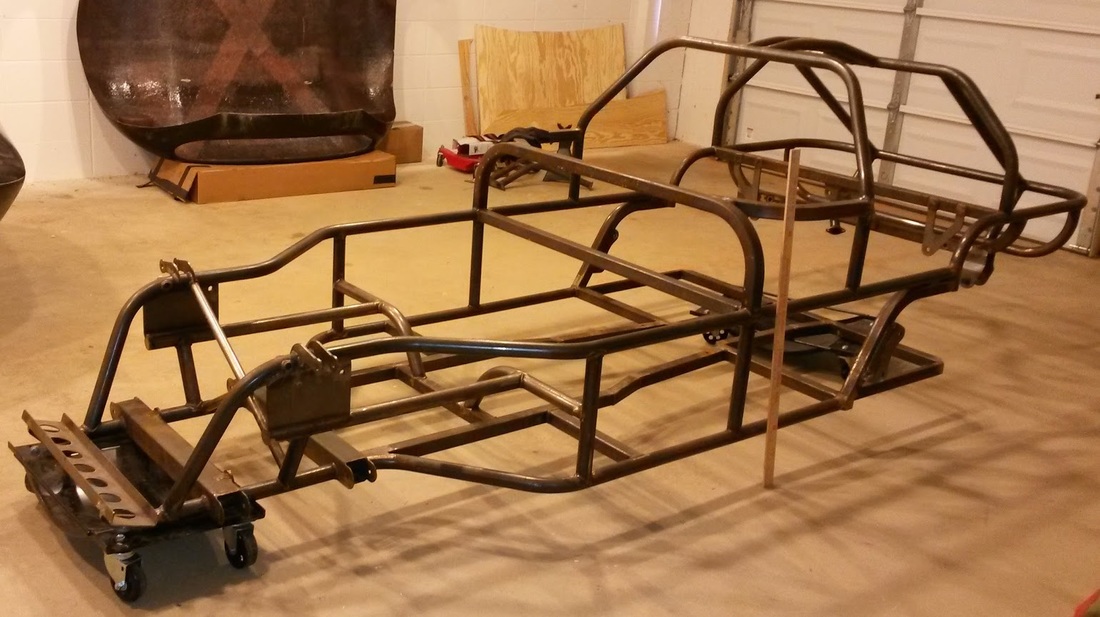
Tube frame chassis (with yard stick for size reference).
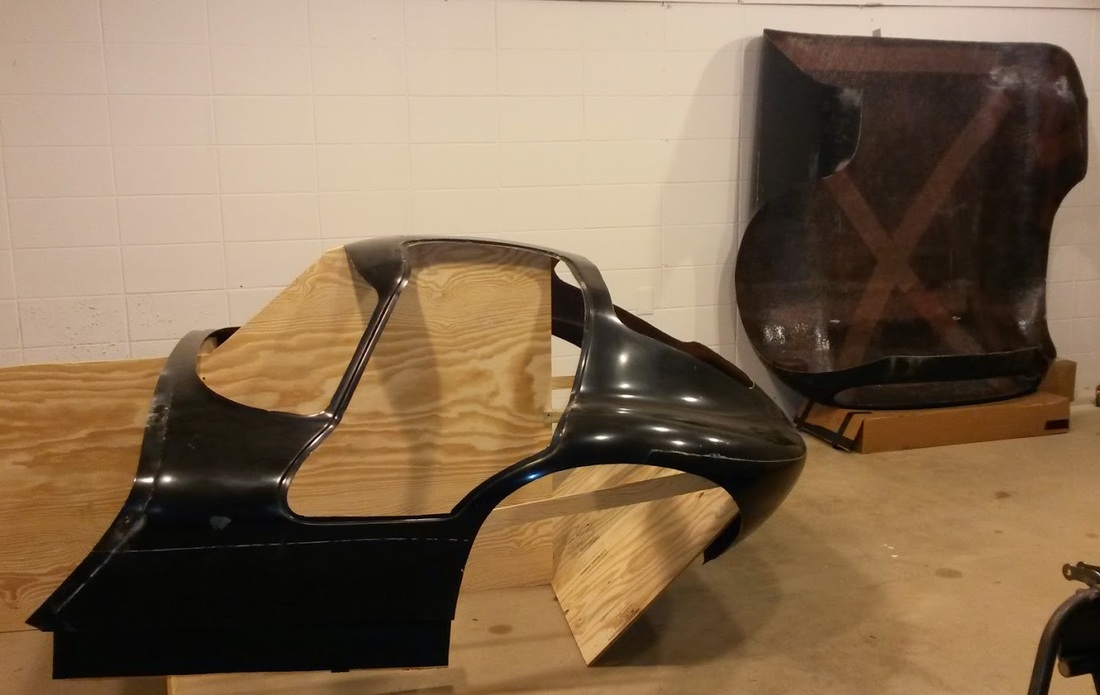
Various metal and fiberglass pieces, windshields, etc.
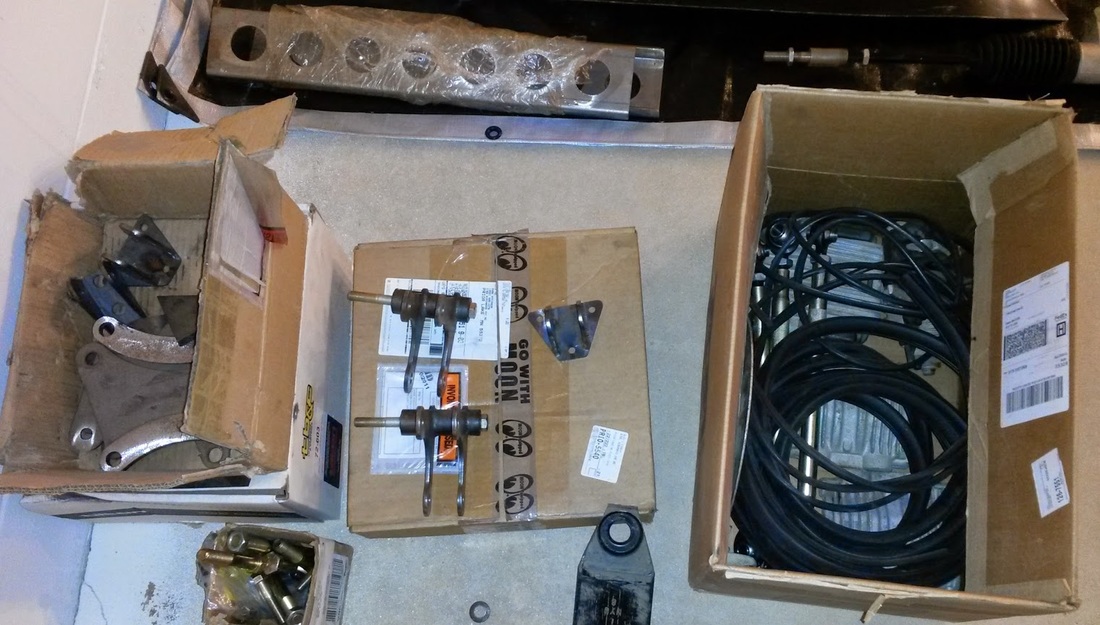
Front and rear suspension pieces from a 1990 Corvette were also included but not pictured. They were being overhauled when these photos were taken.
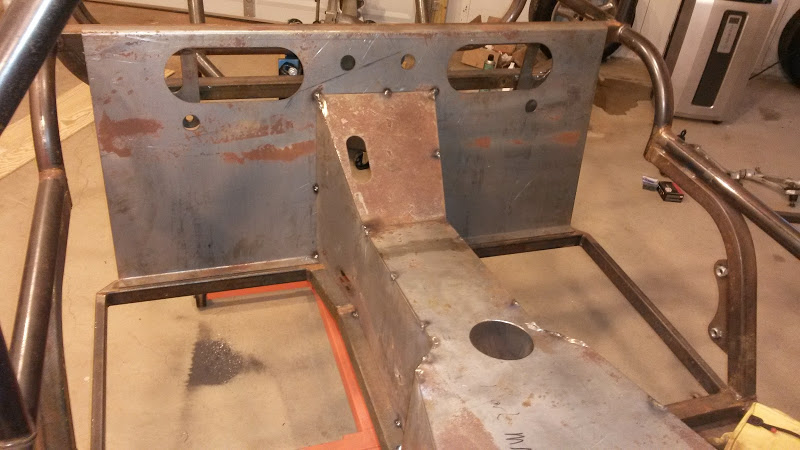
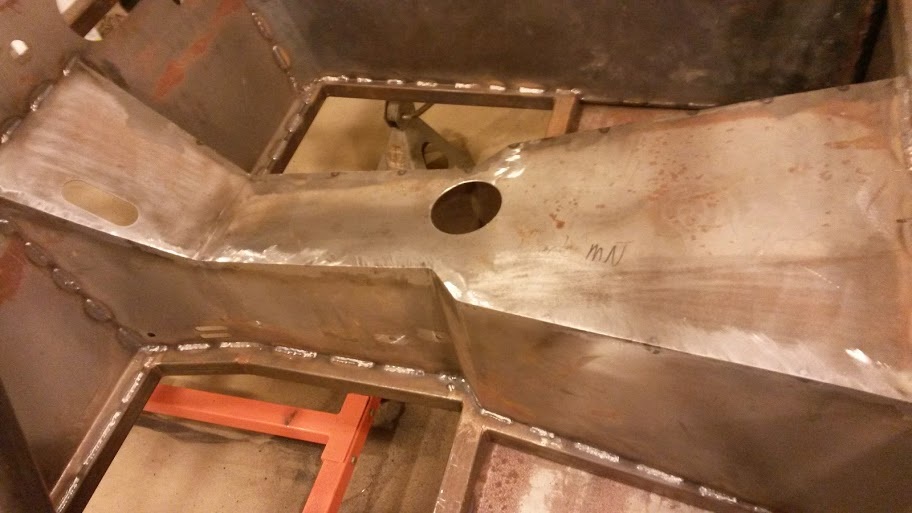
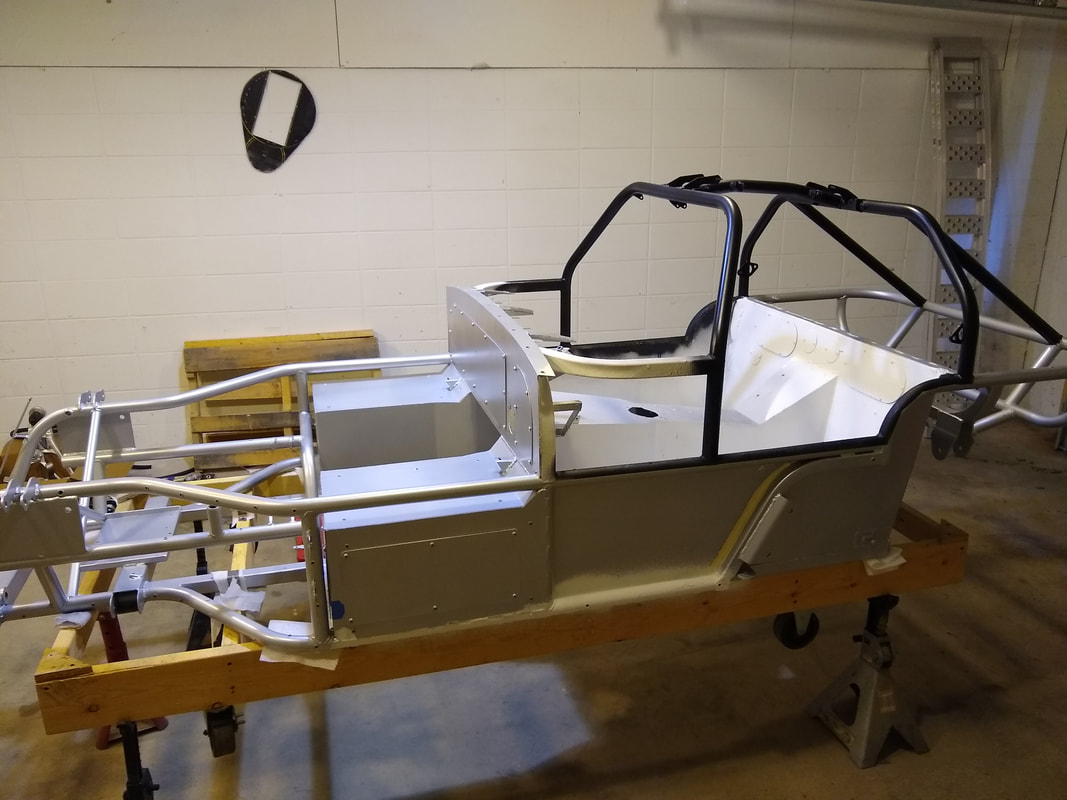
Early work involved modifying the frame and welding in the steel panels that enclose the cockpit.
Early work involved modifying the frame and welding in the steel panels that enclose the cockpit.
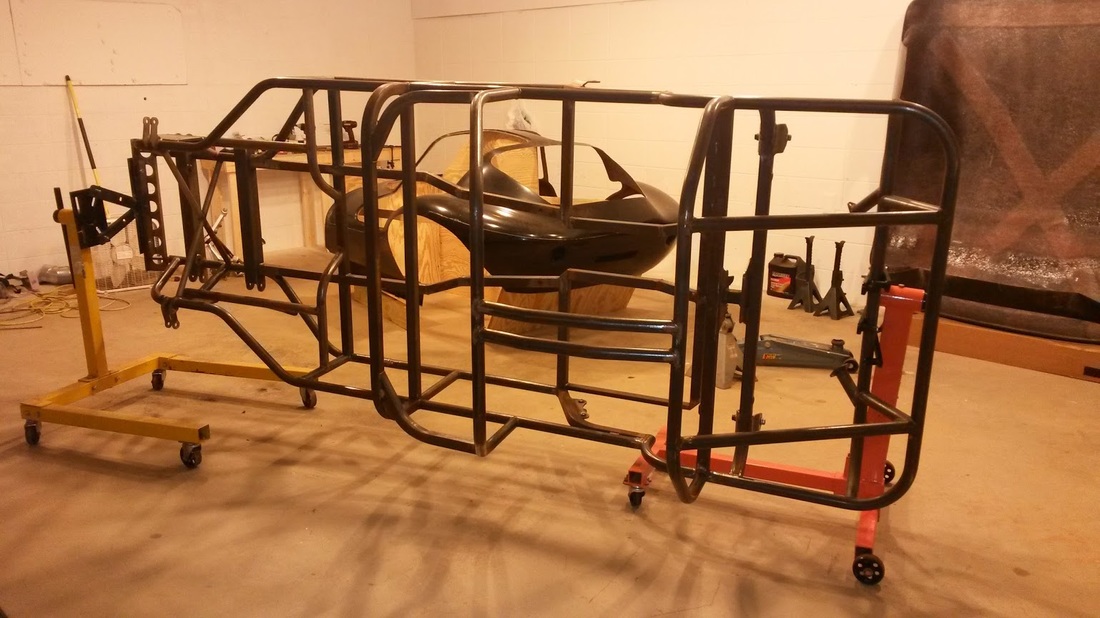
This video shows me grinding and welding on the tube frame. I'm only doing the welding that can't be reached after the sheet metal panels are tacked in place.

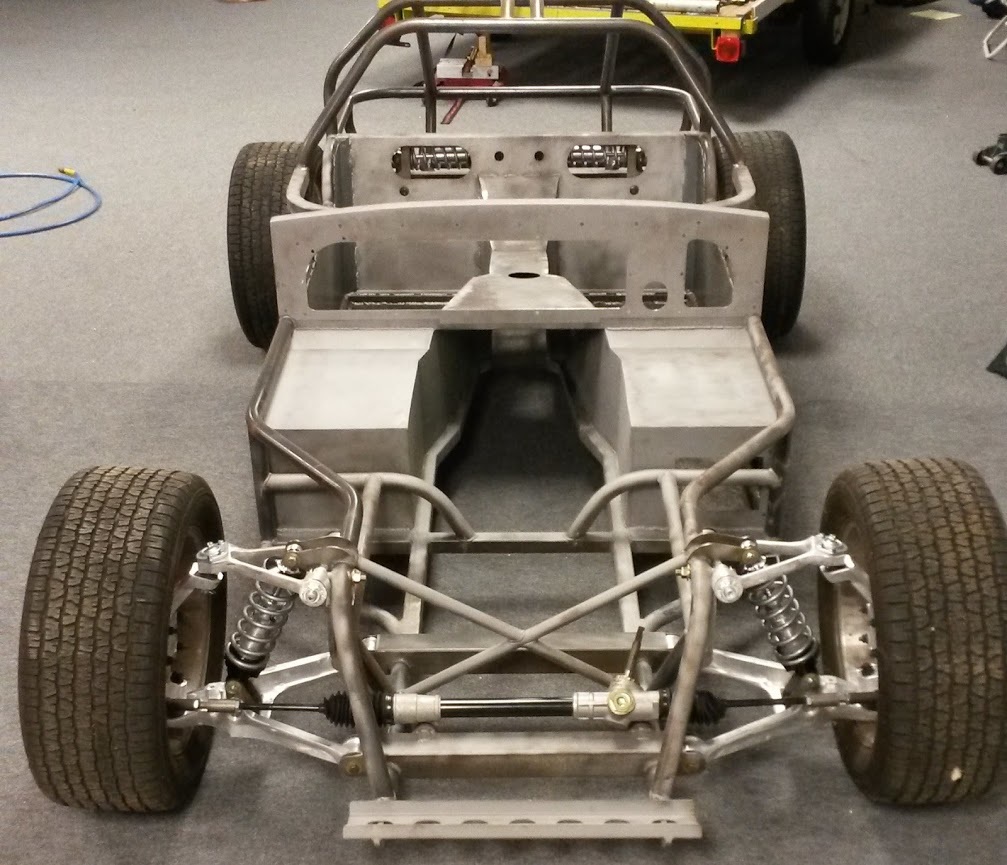
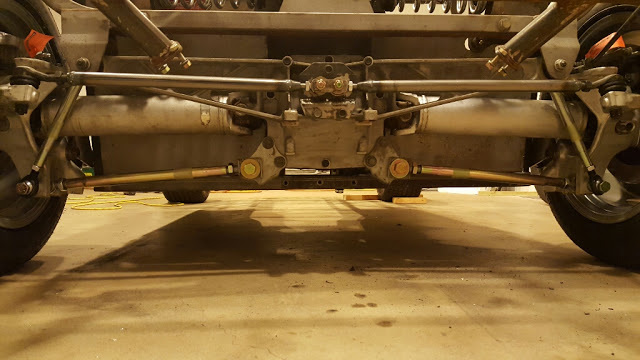
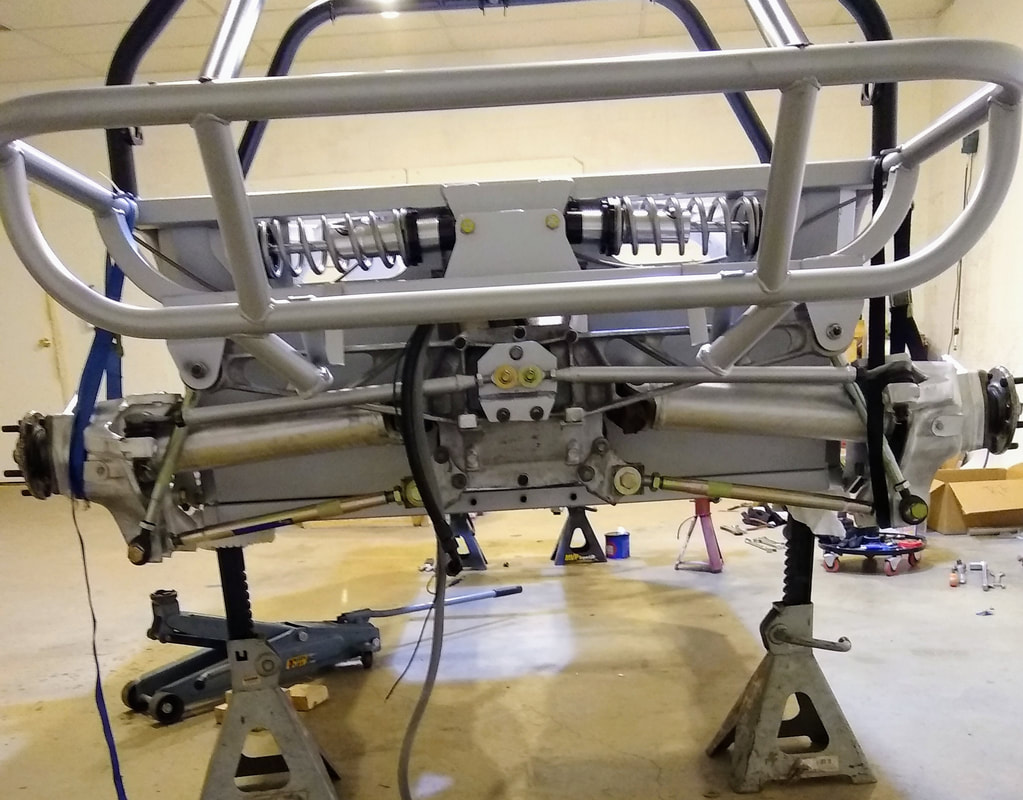
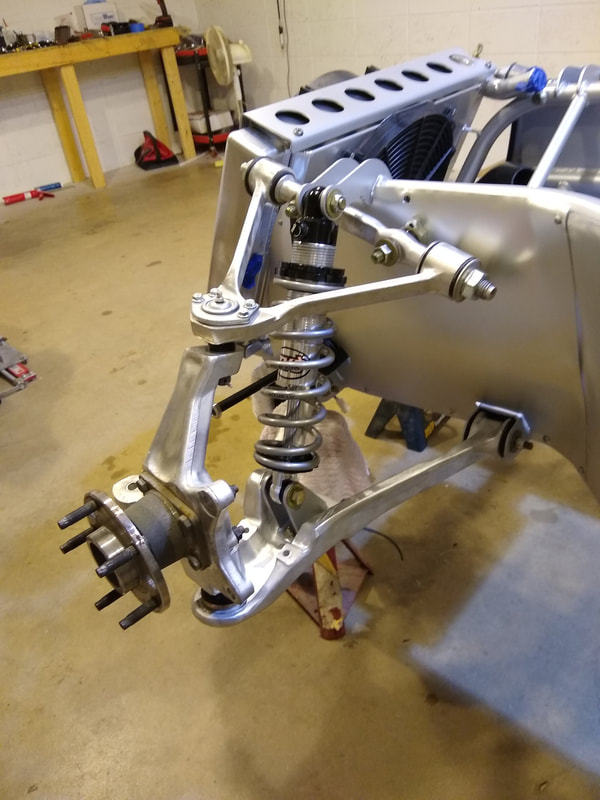
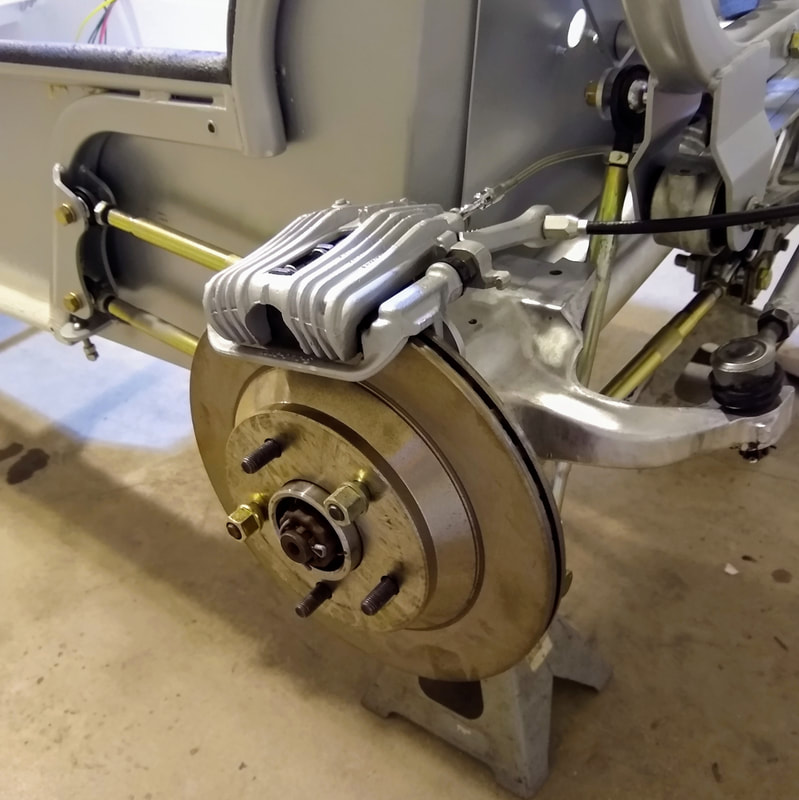
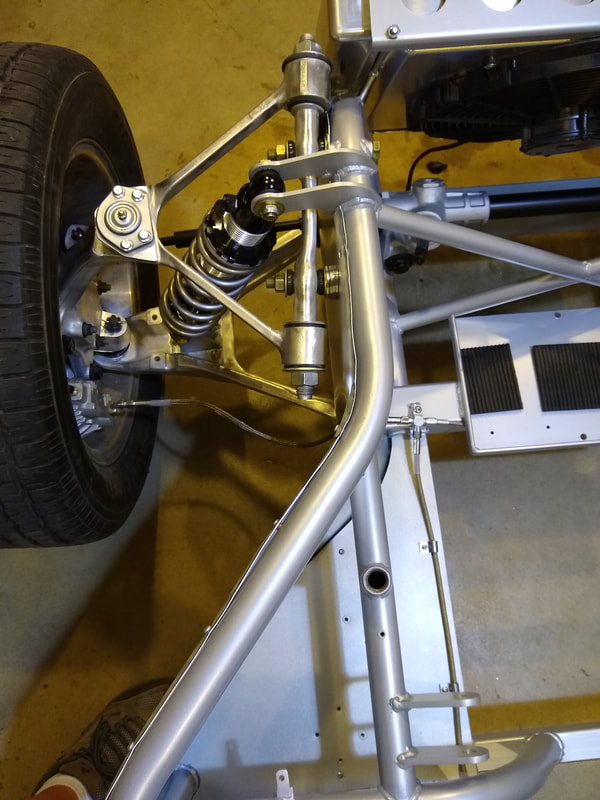
With most of the welding done, I began assembling the front and rear suspensions to make it a rolling chassis. Progress was slow as I discovered some of the parts I had acquired were not correct. With the correct parts gathered and assembled with new bushing and ball joints, the chassis now looks like this. (I later discovered the upper A-arms in this photo are upside down.)
The next step was to begin fitting the fiberglass body and hood to the chassis. As this is essentially a custom built car rather than a bolt together kit, I decided to get help from the man who has built the kit. I packed up all the parts and drove to Ohio where I spent five days working on it.
Much of the work involved fitting pieces together and then gluing and glassing them into their final positions. The following pictures show this required a lot of clamps to hold things in place as they cured.
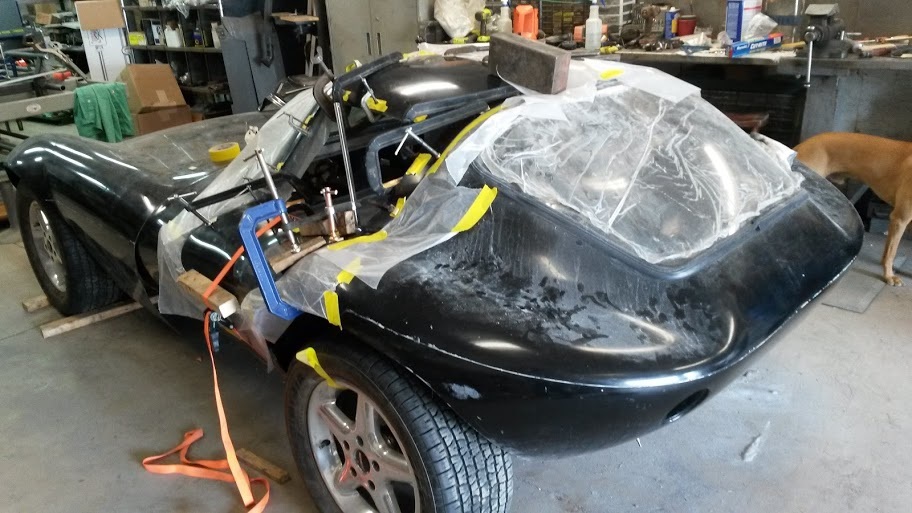
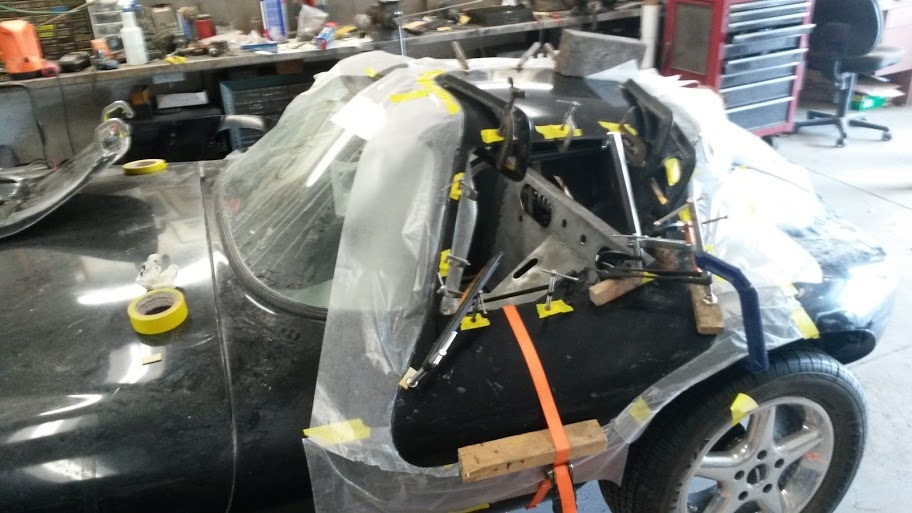
The most challenging part of the job was fitting and gluing the doors. Each gull-wing style door consisted of an inner and outer panel that had to fit to each other, the opening in the body and the hinge system. Getting all the pieces lined up and secured before the glue set was not easy.
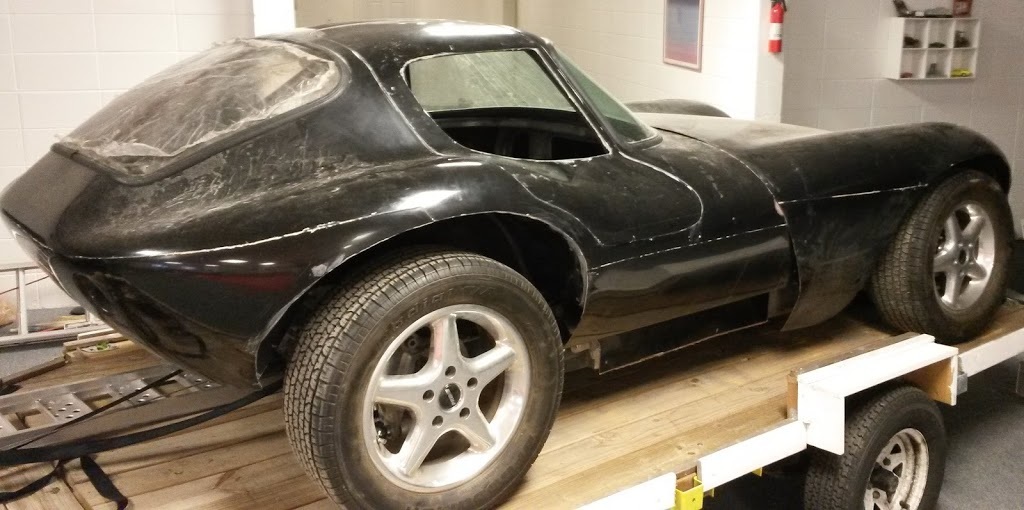
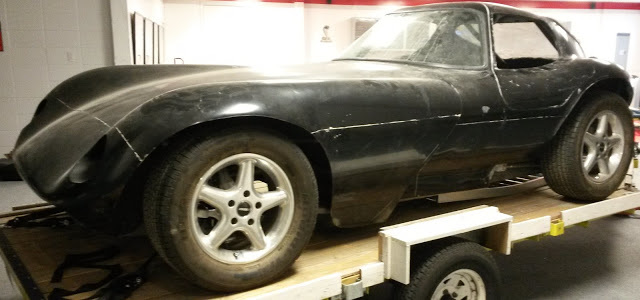
After five long days, I packed up the car and took it home. Back in my garage on temporary wheels and still covered with dust from hours of fiberglass work, the body now looks like this.
After five long days, I packed up the car and took it home. Back in my garage on temporary wheels and still covered with dust from hours of fiberglass work, the body now looks like this.
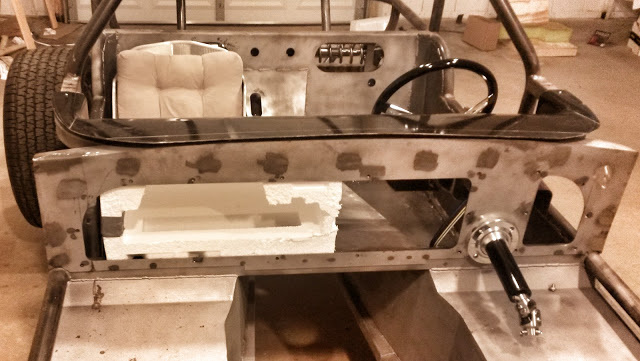
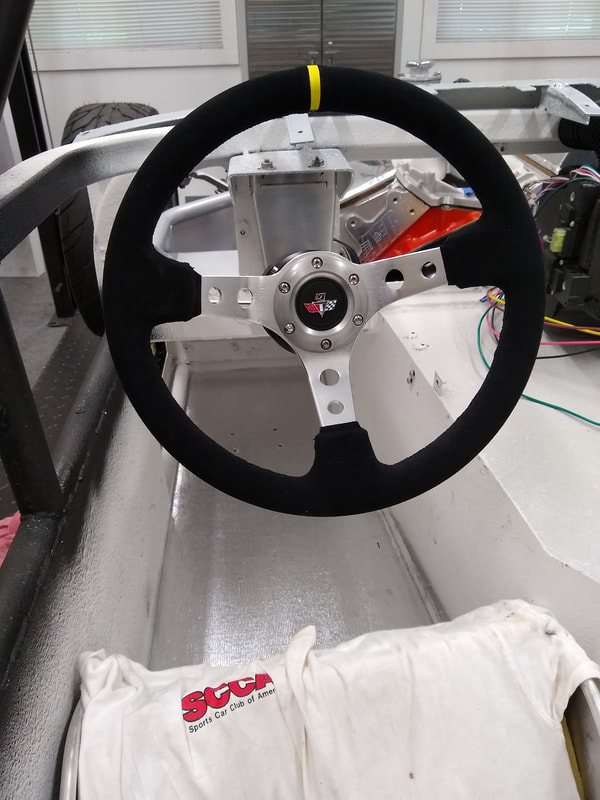
Work over the next few months was slowed by a bad shoulder and recovery from surgery to fix it. But I was able to complete several significant tasks. First, I mocked up a driver's seat and worked out the position of the steering wheel, dash and foot pedal assembly.
I then fabricated new control rods for the rear suspension. These give a larger range of adjustment than the stock rods.
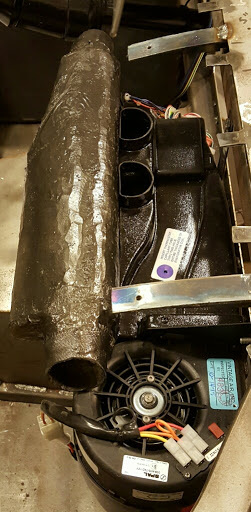
I mounted the HVAC system and fabricated an air manifold to fit in the tight space behind the dash.
My next major task was fabricating fiberglass extensions to both rear fenders to better cover the tires. To get the body to sit right on the mostly empty car, I filled the chassis with concrete blocks to approximate the weight of the drivetrain and other items in the finished car. I then mocked up the fender flares using foam blocks that I sanded to shape by eye. When they looked right, I made a mold of the foam extension and used that to fabricate fiberglass flares that I bonded to the body. It will need a lot of finish work, but the shape is what I wanted.
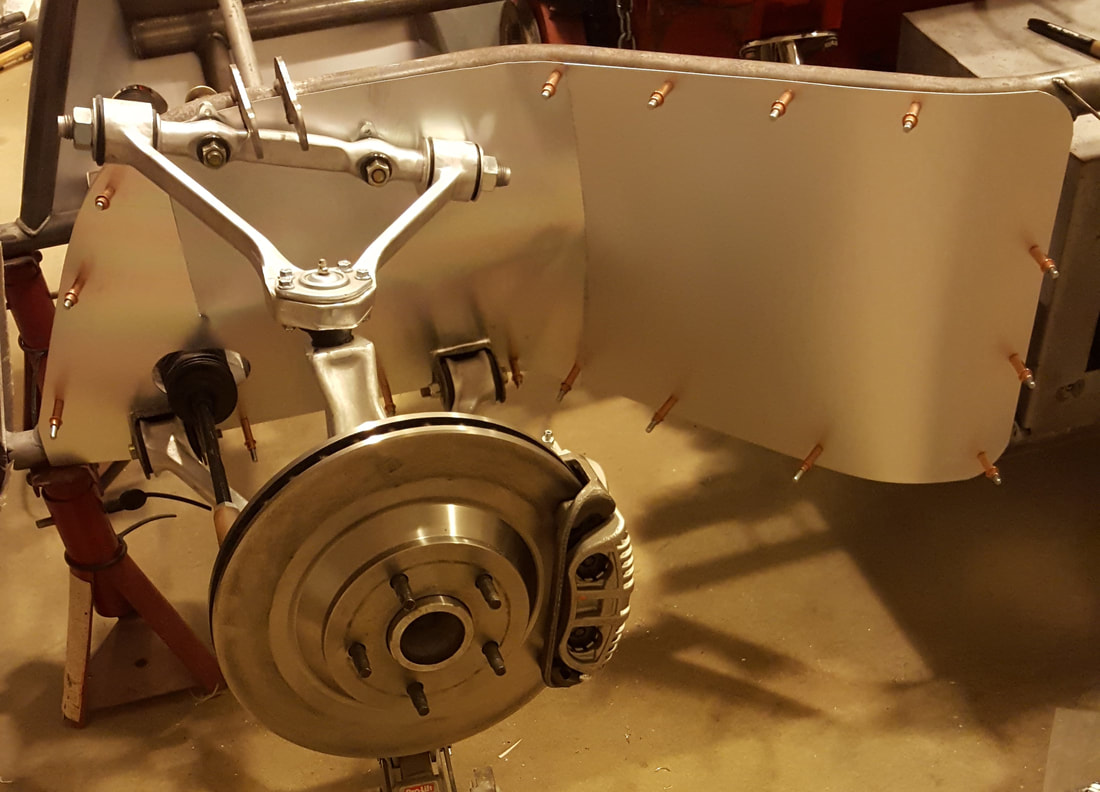
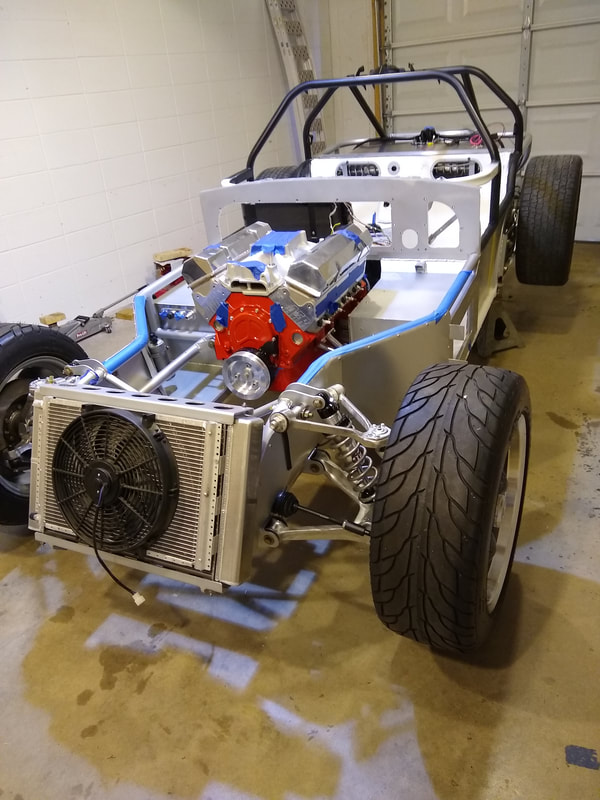
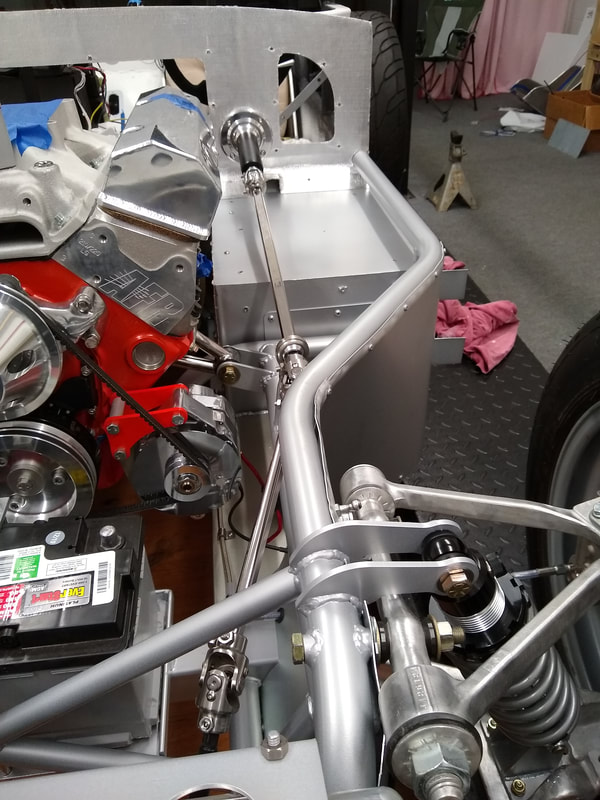
The next big task was fabricating aluminum panels that will attach to the chassis and separate the engine compartment from the front wheel wells. Each of these panels must be trimmed to fit around several things and also shaped in three dimensions to fit. It was tedious work but the finished product worked out well. The following photo was taken while pieces were still being fitted.
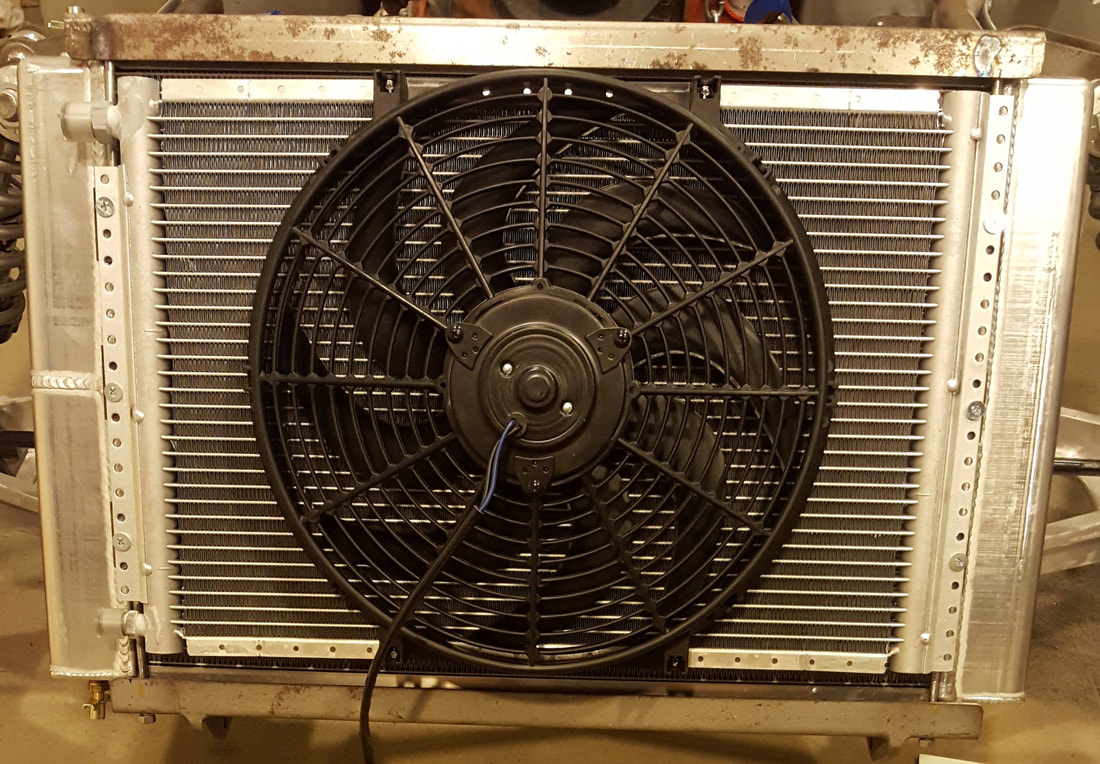
Next to do was fabricating the radiator mount system. The chassis came with the lower radiator pan in place, and the top piece was included. My job was to locate and install four vertical rods (two in front and two in back) to capture the radiator/condenser and secure the top piece. It was also necessary to weld supports from the chassis to the rear vertical rods to carry the weight of the sharply leaned back radiator. This picture from in front of the car looking aft shows the radiator and condensor. It's difficult to see, but the two rods from the bottom to the top also have tabs to secure the condenser in place.
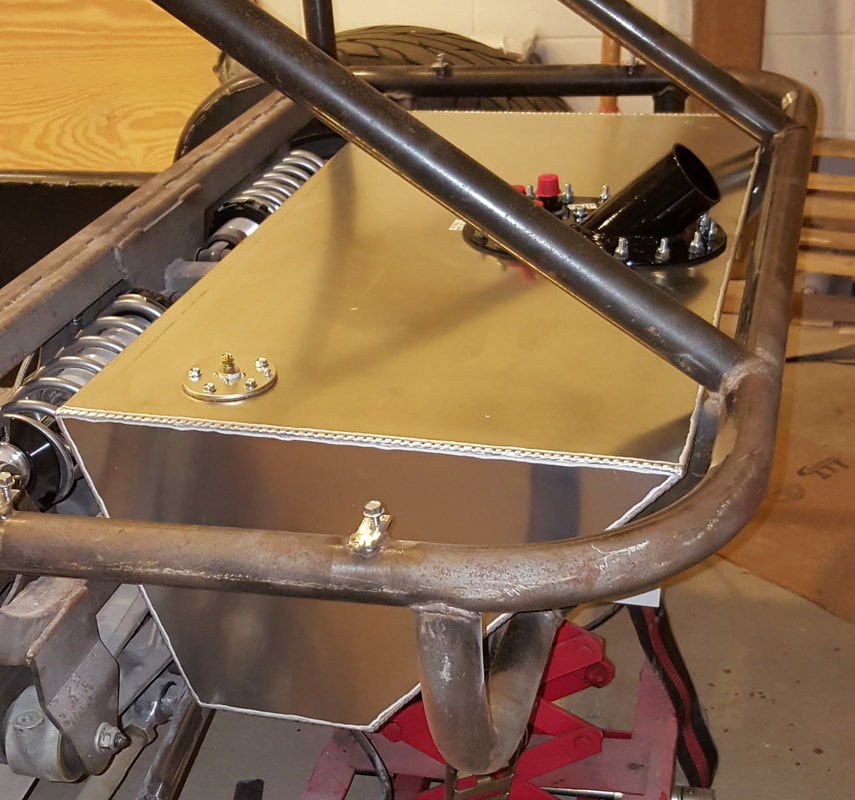
Next was designing and installing a gas tank. This turned out to be more challenging than I expected. On the third try I designed a tank that was large enough to hold a reasonable amount of fuel, small enough to clear suspension pieces and fit through the tight window allowed for installation, and shaped right for the fuel filler to be where it needed to be. I had it custom built for me by the folks at RCI Racing. I then designed and fabricated the mounting system for the tank and for the electric fuel pump that will be mounted beneath it. This shows the tank being fitted for the first time.
At some point in this project I realized the task of finishing the body work (e.g., setting gaps, replacing disturbed gelcoat, smoothing panels for final painting, and doing the painting itself) was beyond me. I decided to ask for help with task and found a willing shop. I set a goal of having the body ready that work by Fall 2018. That meant I needed to complete all the work that would impact the fiberglass body panels before then. Here are some of the systems that needed to be addressed:
For each of these systems I had to do some or all of the final installation to assure that the part of the system that impacted the body would be in the correct place. Here are some of the more interesting issues I addressed during this phase.
During this time I also did the following:
When the engine finally arrived, I assembled the clutch, bell housing and transmission. I then installed it in the chassis and began work on the exhaust system.
- Location of the fuel filler
- Type and installation of headlights, parking lights, turn signal and tail lights
- Routing of wiring to the front and rear lights
- Layout of the windshield wiper system
- Layout of the HVAC and heater hoses
- Layout of the HVAC unit behind the dash
- Type and position of the air cleaner and distributor (the protrude up through the nose)
- Type and location of outside rear view mirror
- Door latches inside and outside
For each of these systems I had to do some or all of the final installation to assure that the part of the system that impacted the body would be in the correct place. Here are some of the more interesting issues I addressed during this phase.
- Selected specialized LED headlights that have parking lights and turn signals integrated into the sealed beams. This eliminated the need for separate front parking lights and turn signals.
- Fabricated clear plastic headlight covers to protect the lights and give the nose a more finished look.
- Selected a license tag bracket with an integrated rear view camera, backup lights and a matching rear view mirror with integrated LED display.
- Obtained LED tail light elements to provide better rear illumination in the single 1963 Corvette style tail lights on each side in the rear.
- Selected a wiring assembly, fabricated a mount for the fuse panel and installed the panel
- Finalized the layout for gauges and switches in the dash.
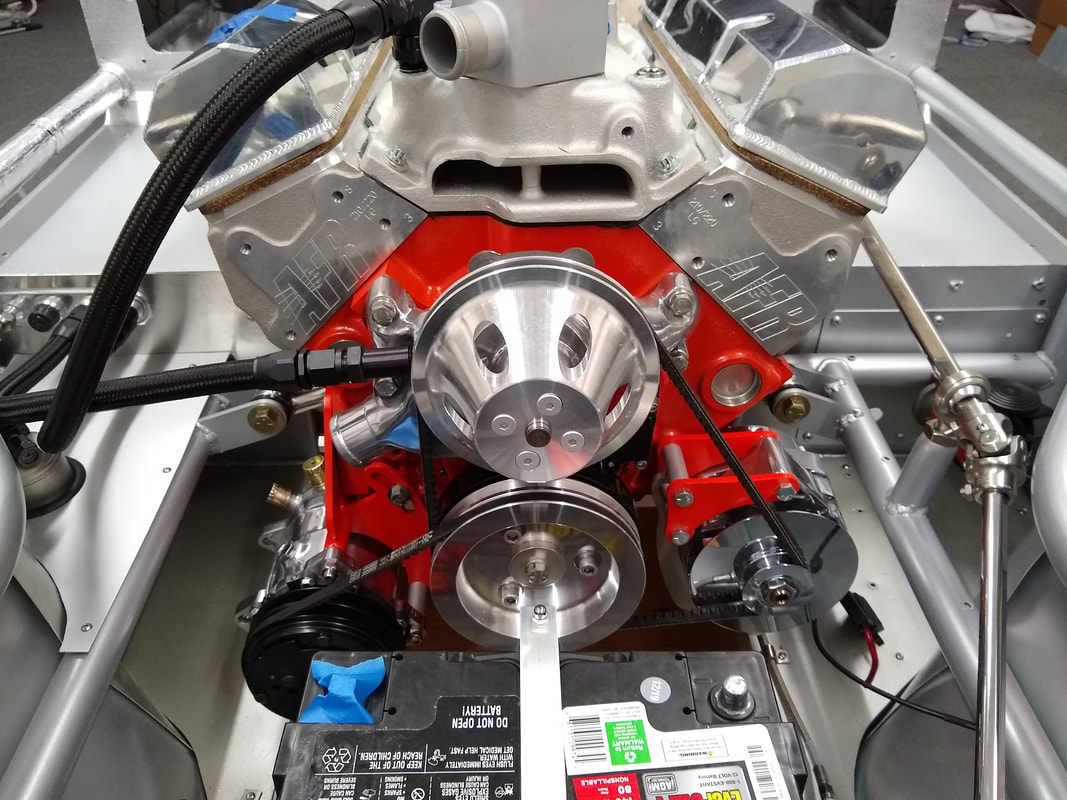
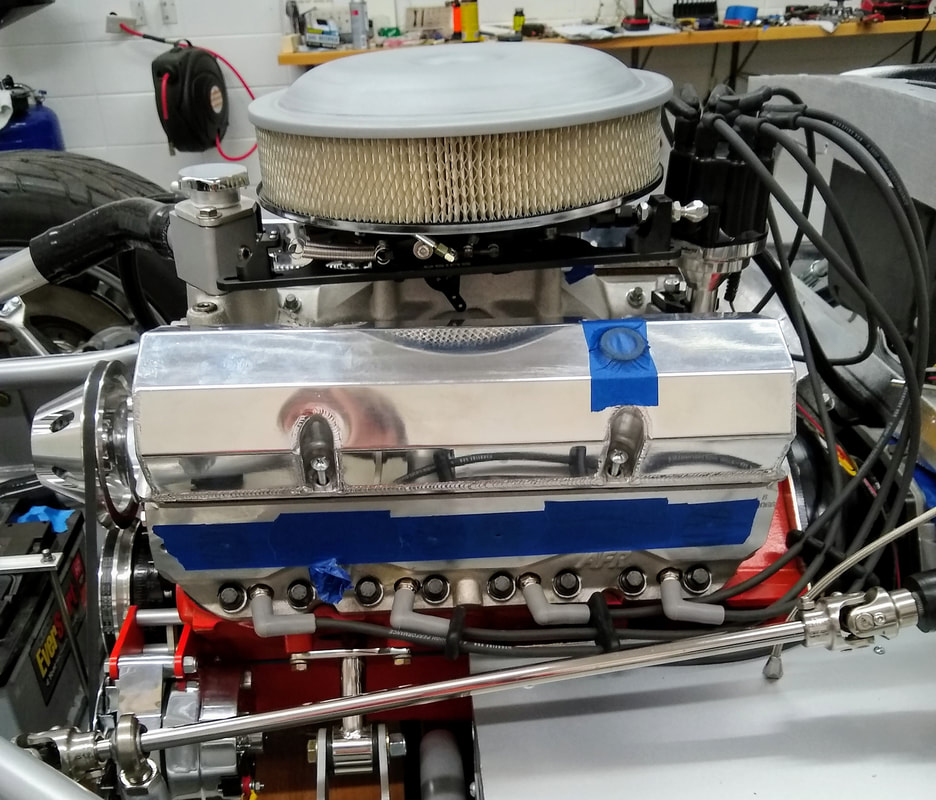
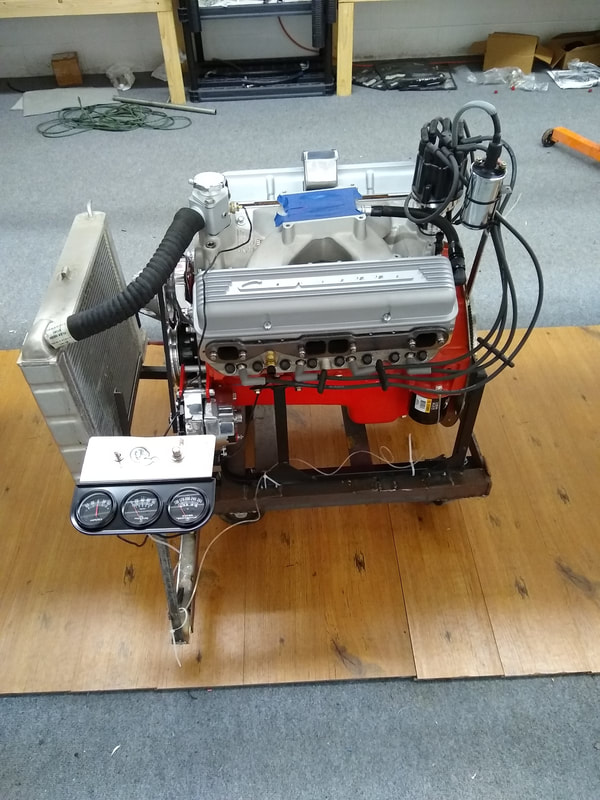
- Selected and installed the final engine, air cleaner and distributor.
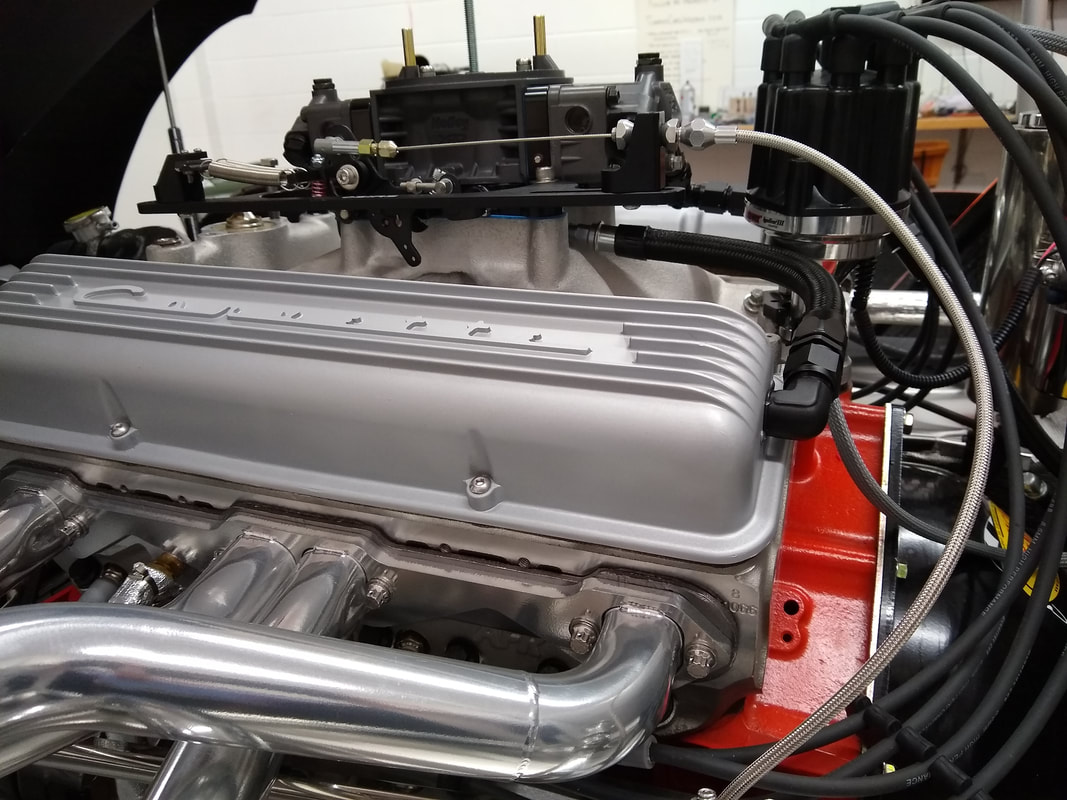
- The engine is based on the small block Chevy design used in 1964 but was custom built using a Dart block, AFR heads, high end internal components and a Holley 850 CFM carburetor producing about 600 horsepower.
- Designed and fabricated custom latches to secure the upward swinging gullwing style doors.
During this time I also did the following:
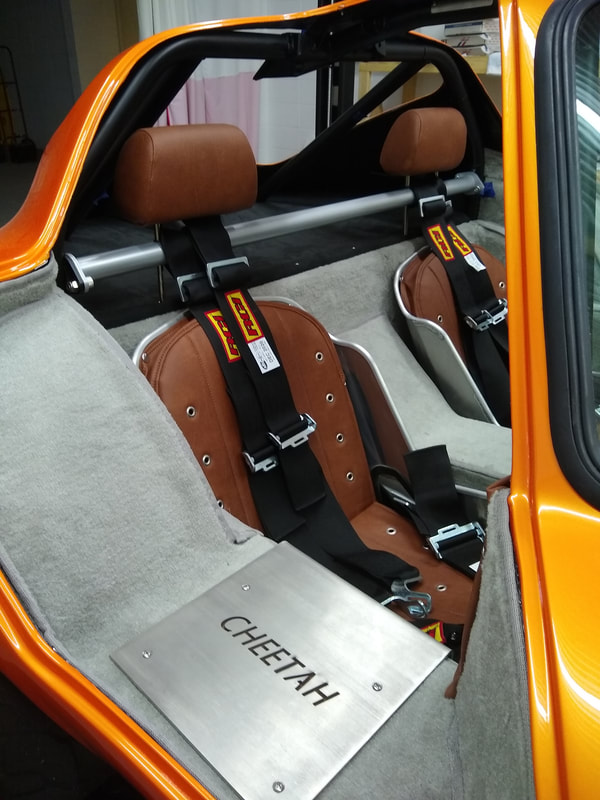
- Fabricated and installed the tube that runs behind the seats to support the shoulder harnesses and headrests
- Fabricated a mount and installed the electric fuel pump
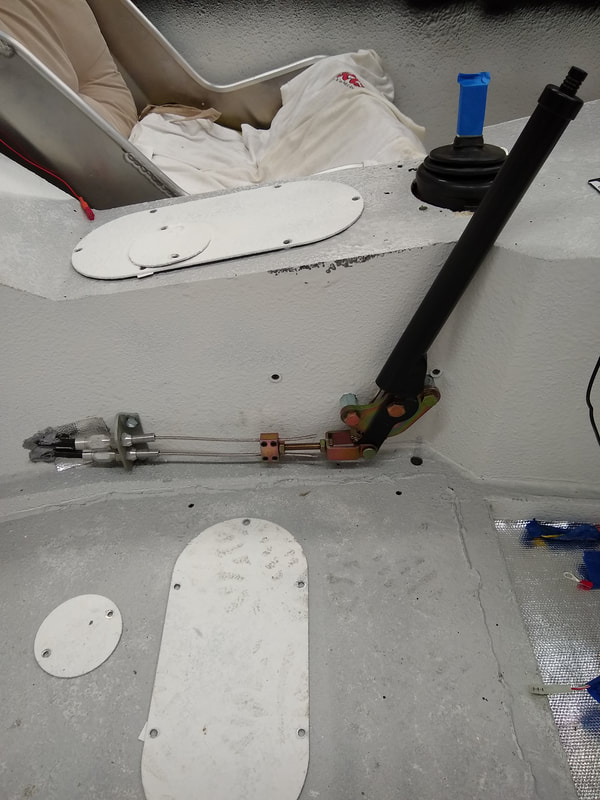
- Fabricated components needed to install the wiper system
When the engine finally arrived, I assembled the clutch, bell housing and transmission. I then installed it in the chassis and began work on the exhaust system.
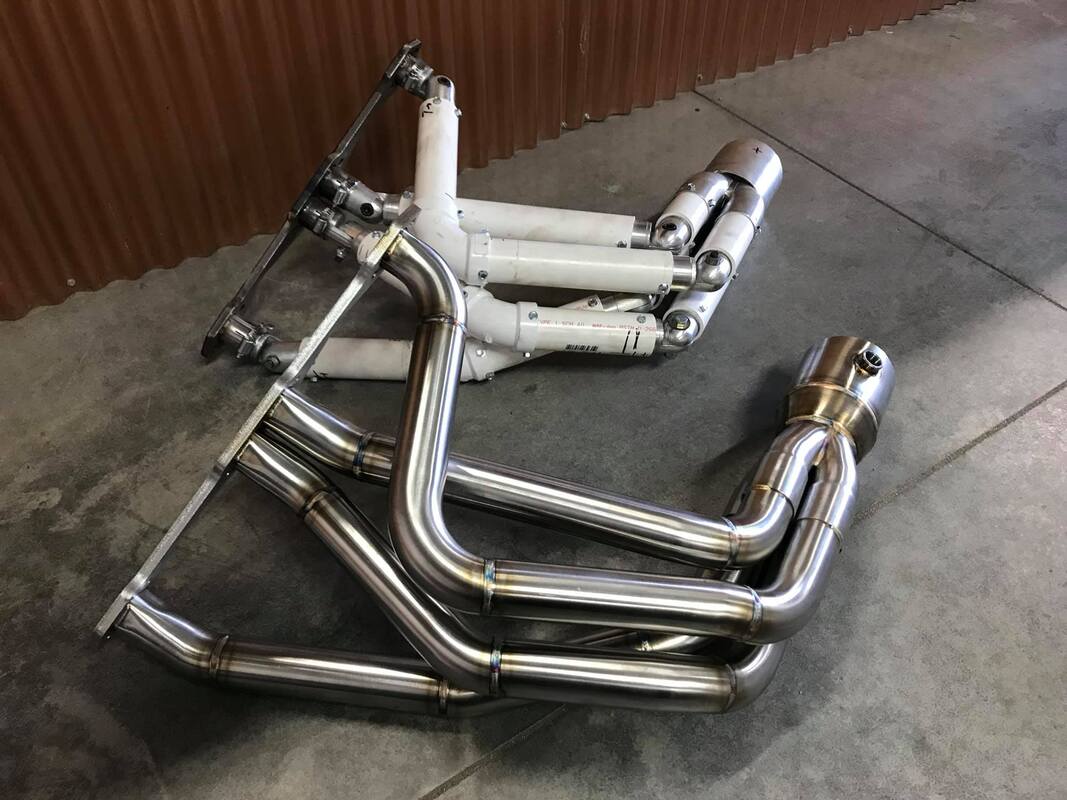
- I Mocked up the header system in PVC pipe and sent it off to GPHeaders to have them custom built in stainless steel
- I then fabricated the rest of the exhaust system from stainless bends, V-band connectors and four inch stainless exhaust pipes
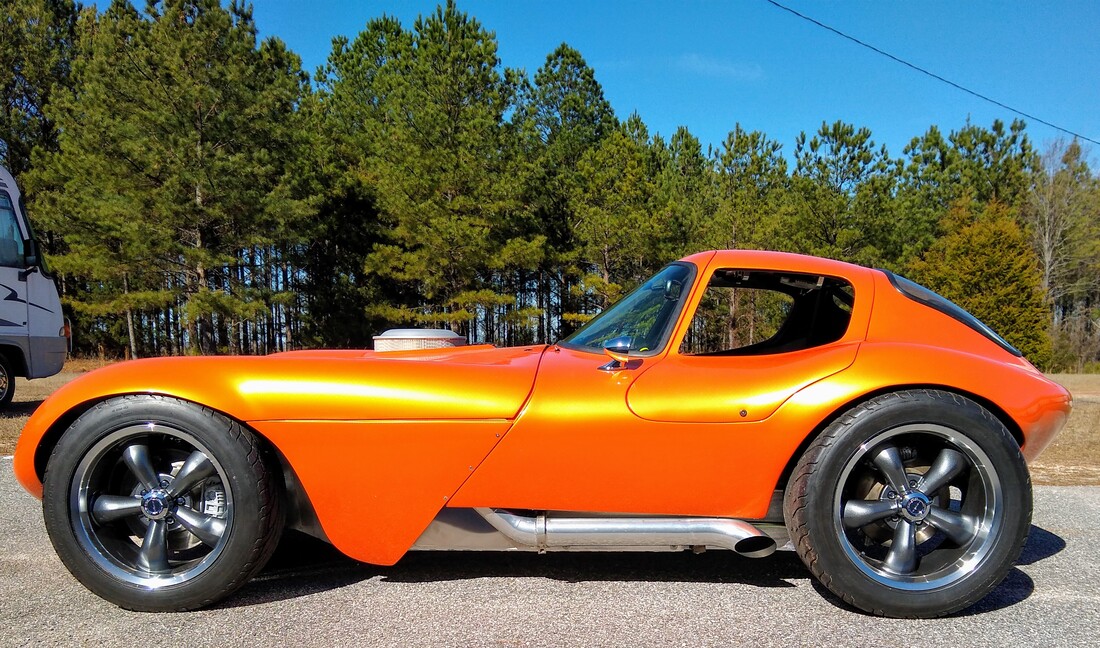
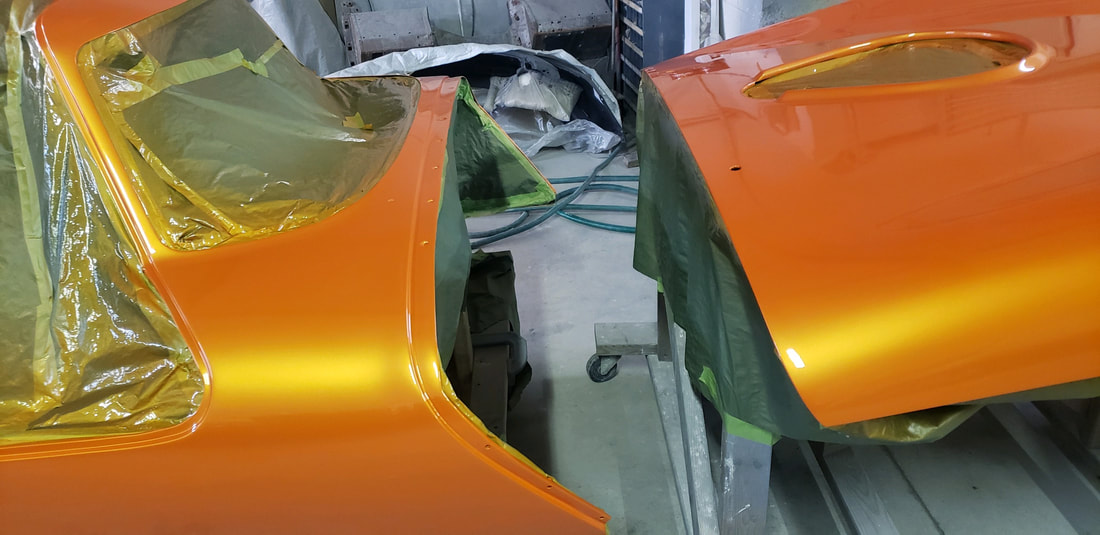
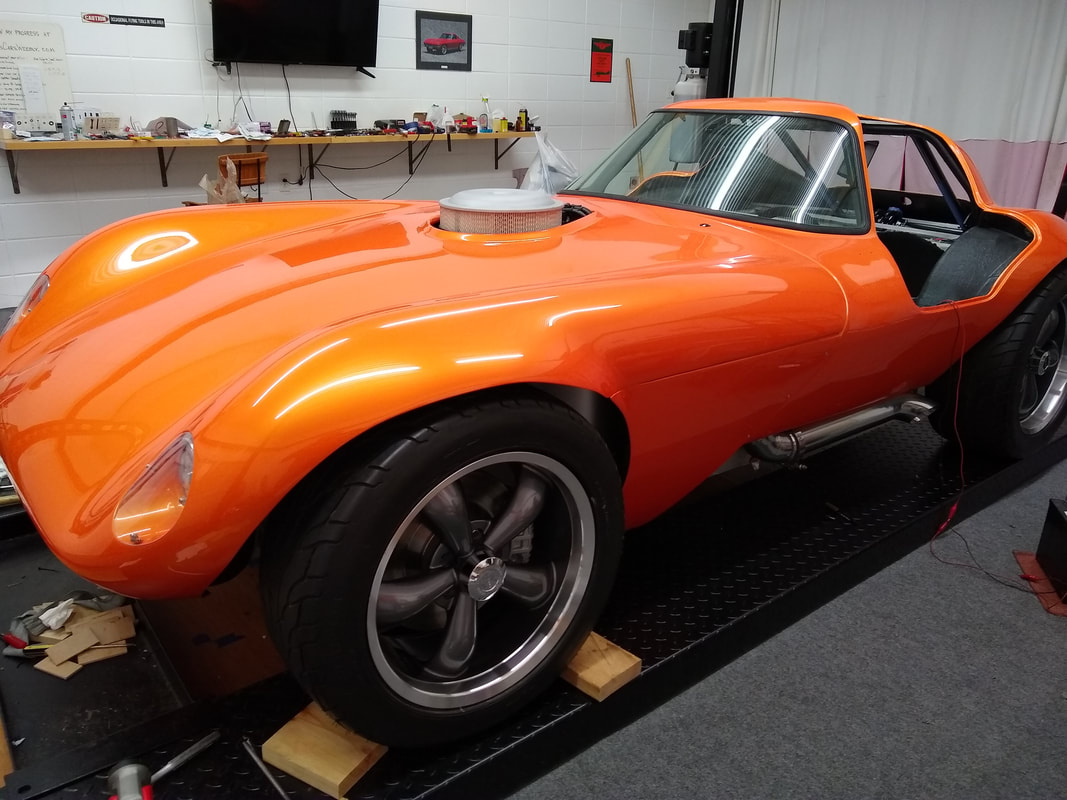
By November 2018, I had completed enough prepatory work to have the shop finish the detailed body work and paint. I delivered the car and waited. It was more than a year before he finished his part and even then it happened only because I forced the issue. The paint job was finished in early February 2020. This photo shows the color of the finished paint. It is a custom variation of the C7 Corvette color Atomic Orange.
Much of the detailed finish work I expected to be done by the paint and body shop was either done poorly or not at all. As a result I spent much of the next few months completing that work. When the pandemic hit, I spent virtually all of my time working on the Cheetah project until the chassis was ready for media blasting and powder coating. When that was done I seam sealed the cockpit and painted the parts of the frame that would be visible in the cockpit matte black. With the installation of insulated fabric under the transmission tunnel, I was ready to start assembling the car.
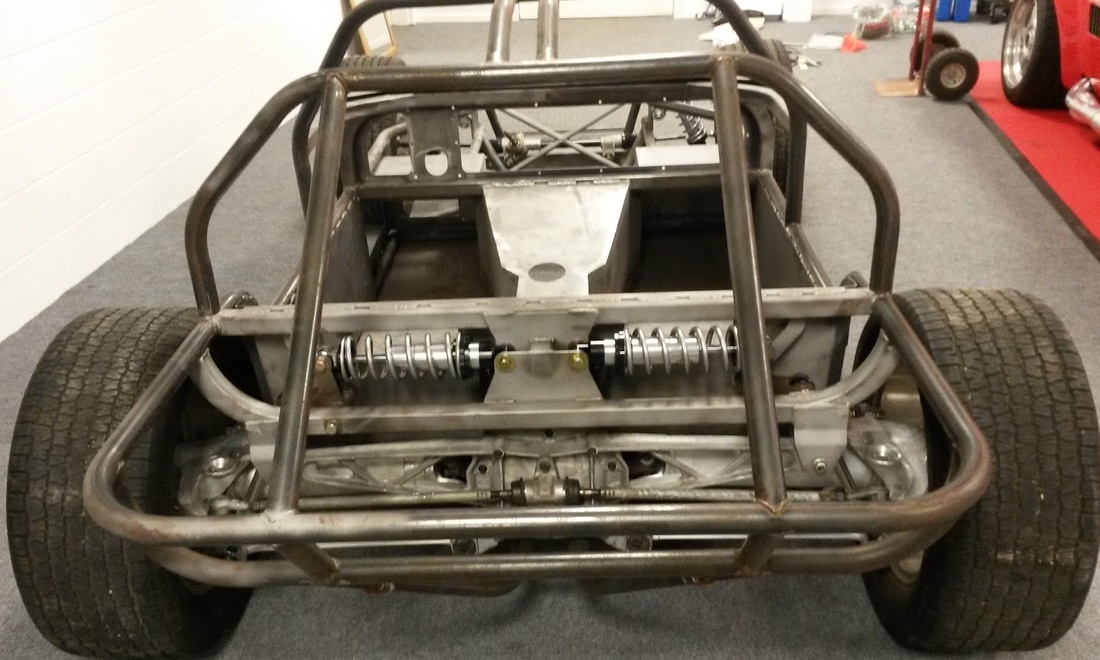
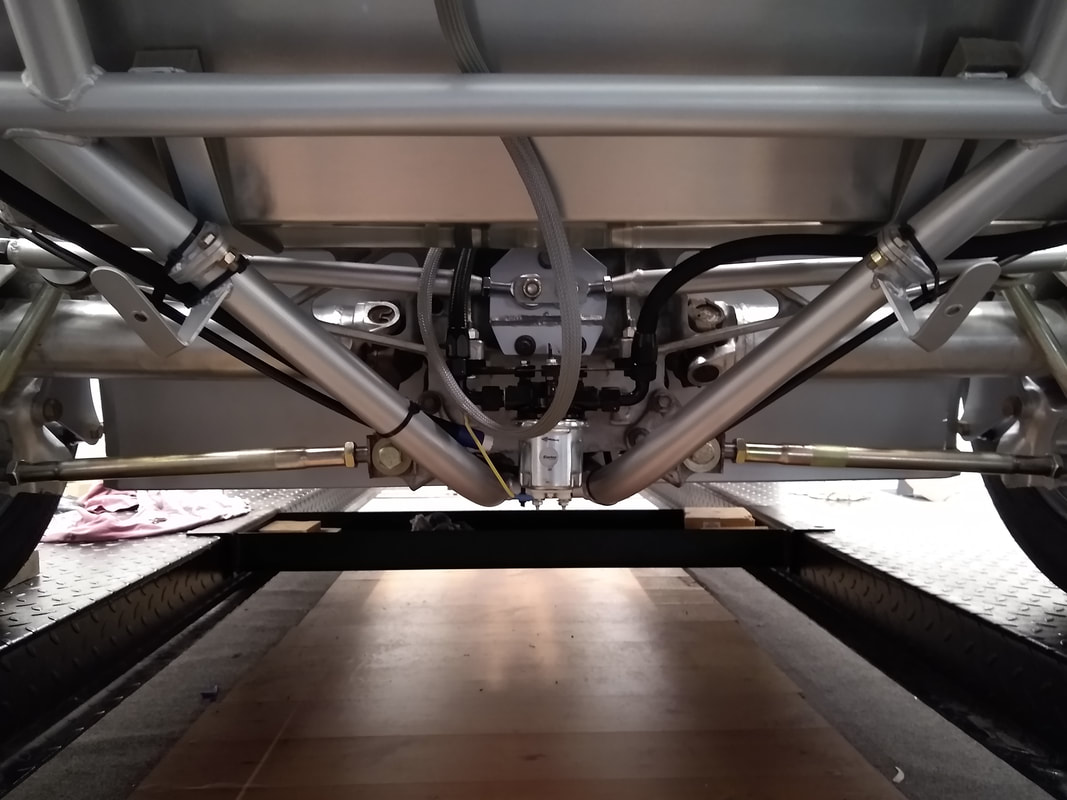
The next big steps were installing the rear suspension, front inner fenders and front suspension.

Next came brakes, wheels and fuel tank.
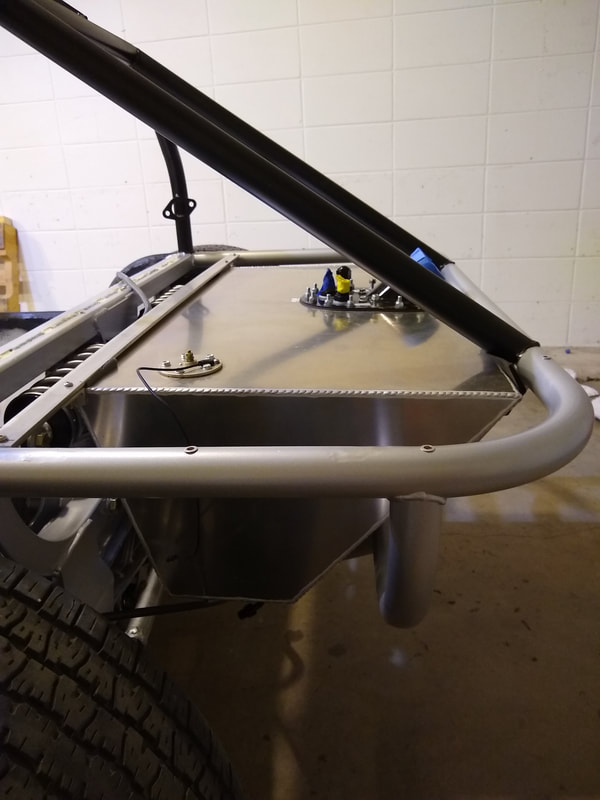
Next came test fitting the rear shelf that covers the fuel tank. Then, after the radiator and parts of the HVAC system were installed, my nephew Bill helped guide the engine and transmission into place.
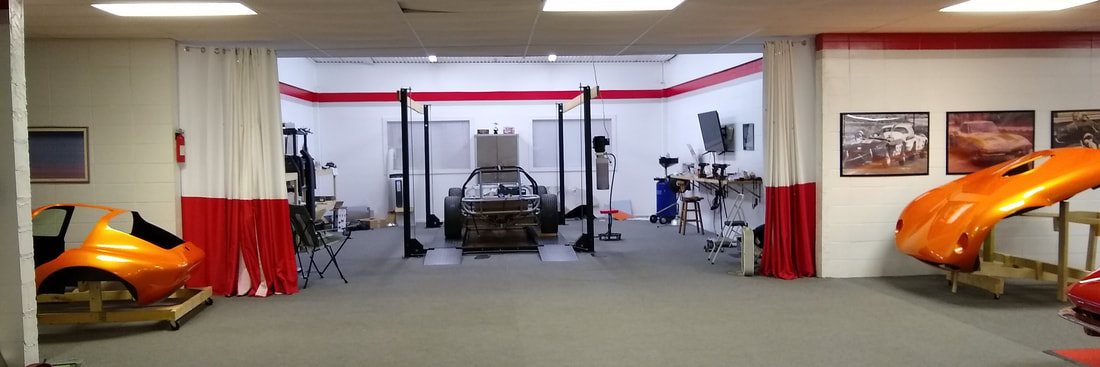
All the work to this point had been done in a small garage suitable for messy work and heavy equipment like an engine hoist. With that phase complete, I reunited the chassis with the body in my larger and more comfortable garage with a lift.
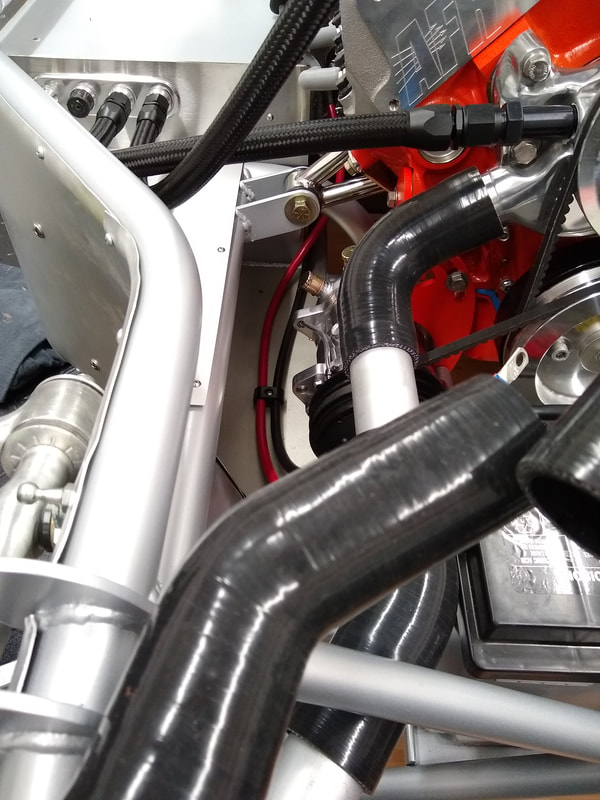
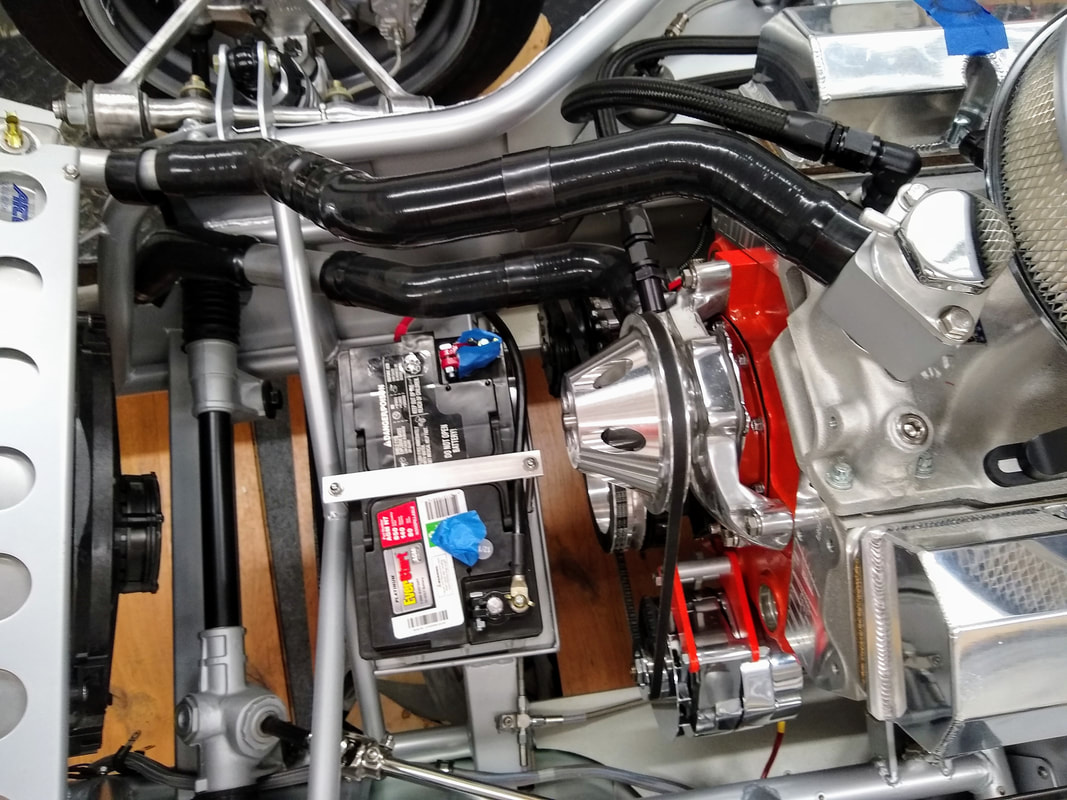
Next came lots of components: water pump and heater hoses, alternator and air conditiioning compressor, battery, steering, parking brake, fuel pump, and lots of insulation to shield the cockpit from the exhaust that wraps around it. Then I plumbed the fuel lines, installed the distributor, made up the spark plug wires and mocked up the upper and lower water hoses that will be clamped when I'm sure everything around them fits.
The next phase is going slowly: electrical. I designed and constructed the system myself starting with an off-the-shelf hot rod fuse panel. I did several harnesses in advance. Still, I find it challenging to fit all that spaghetti wiring in a tight space without leaving a few wires too short, many too long and a rat's nest of wires.
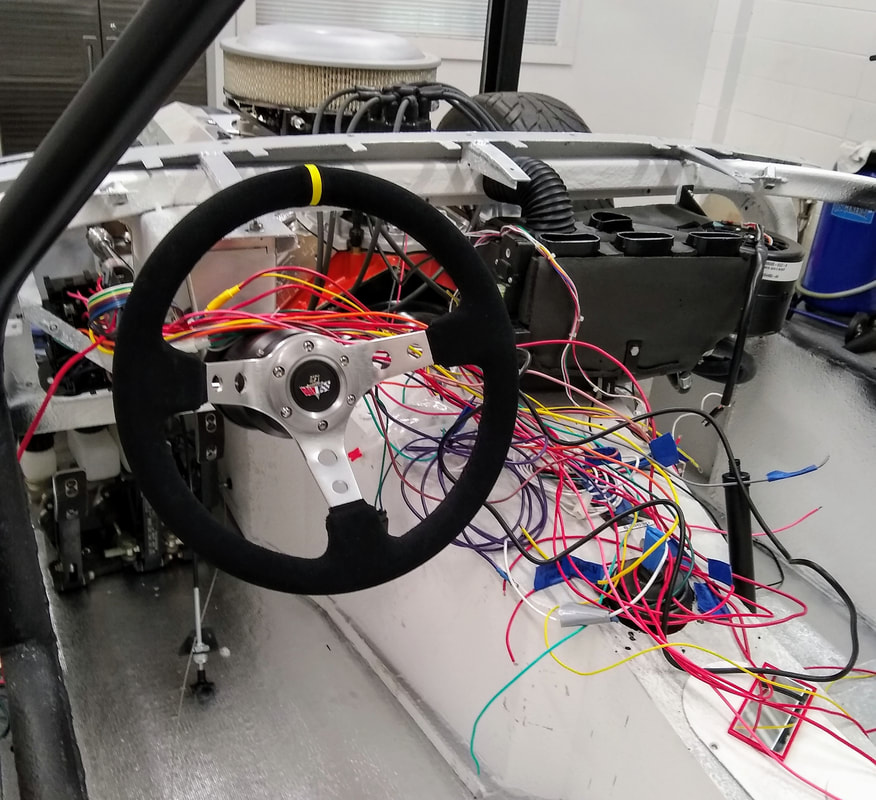
Trimming wires to length, fitting wire ends and shrink tube is a tedious job that took the better part of four days. At the end I pulled all the fuses, checked the circuit continuities and applied power to one small section at a time. As I replaced each fuse I tested the systems it energized. No shorts or burning components! But I did discover a few systems that did not function as expected. For example, I discovered one relay was wired incorrectly and another took power from a different part of the fuse block than I expected. But in the end I was able to successfully test every electrical system except those that can't be installed until the body is in place (e.g., wipers and headlights).
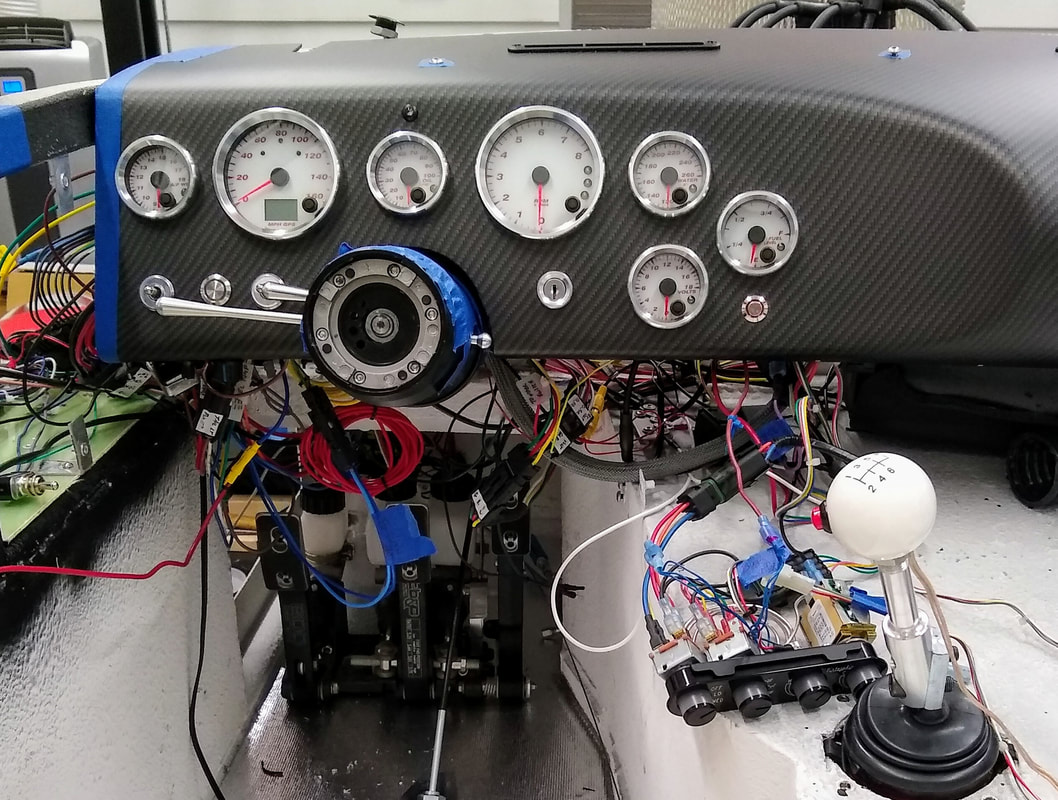
In order to test the electrics I had to temporarily install the dash and all of its connections. During that process I discovered the steering column position needed to be adjusted slightly. I also set to work fitting the HVAC ducts that feed the center console outlets. Fitting the evaporator, air ducts, defrost ducts and wiring behind the dash must be like building a ship in a bottle working only throught the neck. Here are photos of wiring in progress and testing the dash lights in a darkened room.
In order to test the electrics I had to temporarily install the dash and all of its connections. During that process I discovered the steering column position needed to be adjusted slightly. I also set to work fitting the HVAC ducts that feed the center console outlets. Fitting the evaporator, air ducts, defrost ducts and wiring behind the dash must be like building a ship in a bottle working only throught the neck. Here are photos of wiring in progress and testing the dash lights in a darkened room.

Taking a break from wiring I finished installing the coolant hoses using shrink style clamps. I hope they seal as good as they look.
WIth the cockpit wiring mostly done, I moved on to wiring the front and rear electrics. I had run the harness for the rear inside the tunnel before I installed the drivetrain. By temporarily hooking up the tail lights, backup lights and camera I was able to confirm they all worked well. I then installed them in the body so they'll be ready to hook up when it is put on the chassis.
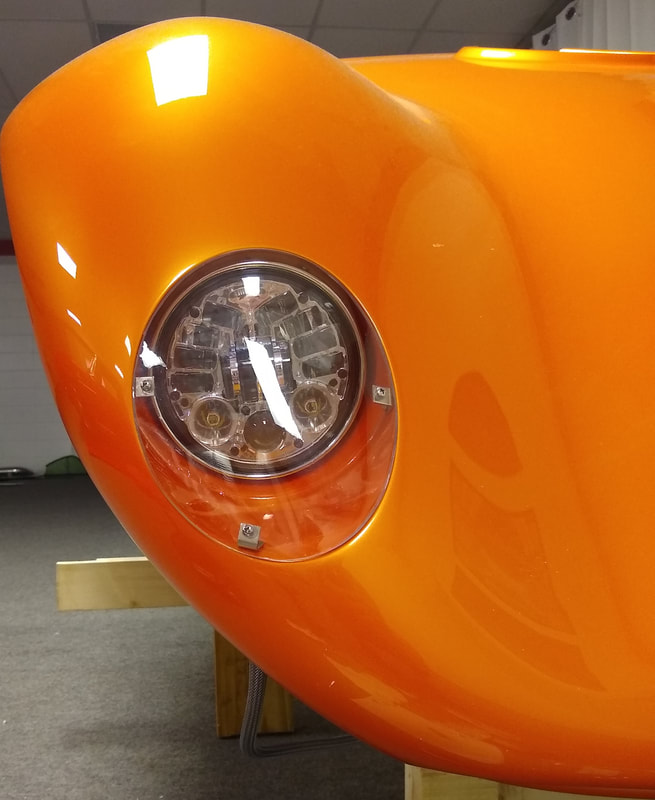
I had prepared the harness to the nose some time ago, so I ran the part from the fuse block to the front of the chassis. It will power the lights and fans for the radiator and HVAC condensor. When the nose is in place, that harness will attach to another I made that connects the front lights. The front lights are 5-3/4" LED lights with parking and turn signal elements built in. They are covered by Lexan pieces I fabricated to give the front of the car a sleeker look. Here's a picture of one installed.
I had prepared the harness to the nose some time ago, so I ran the part from the fuse block to the front of the chassis. It will power the lights and fans for the radiator and HVAC condensor. When the nose is in place, that harness will attach to another I made that connects the front lights. The front lights are 5-3/4" LED lights with parking and turn signal elements built in. They are covered by Lexan pieces I fabricated to give the front of the car a sleeker look. Here's a picture of one installed.
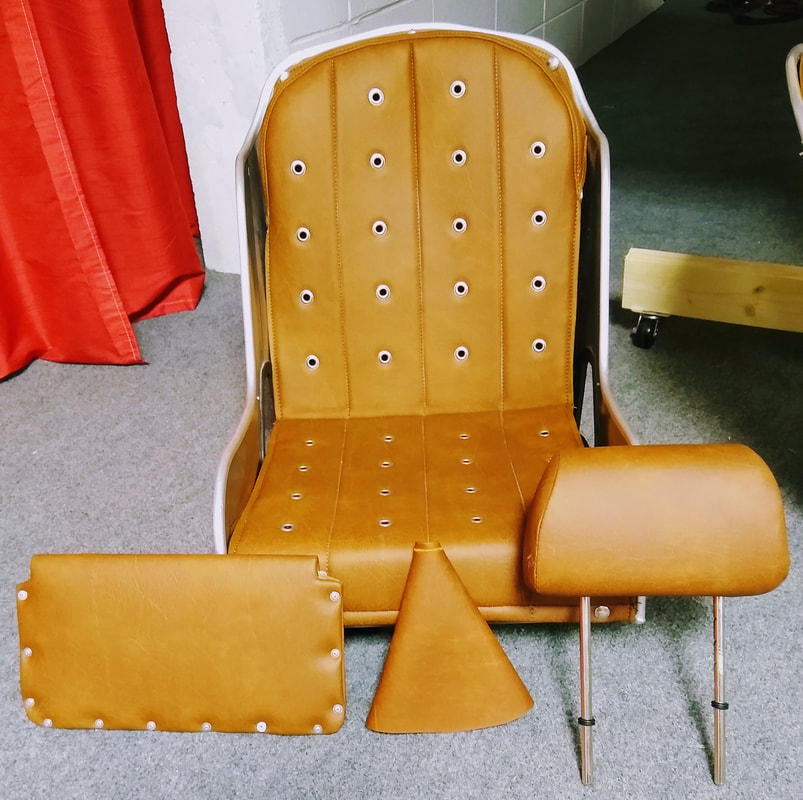
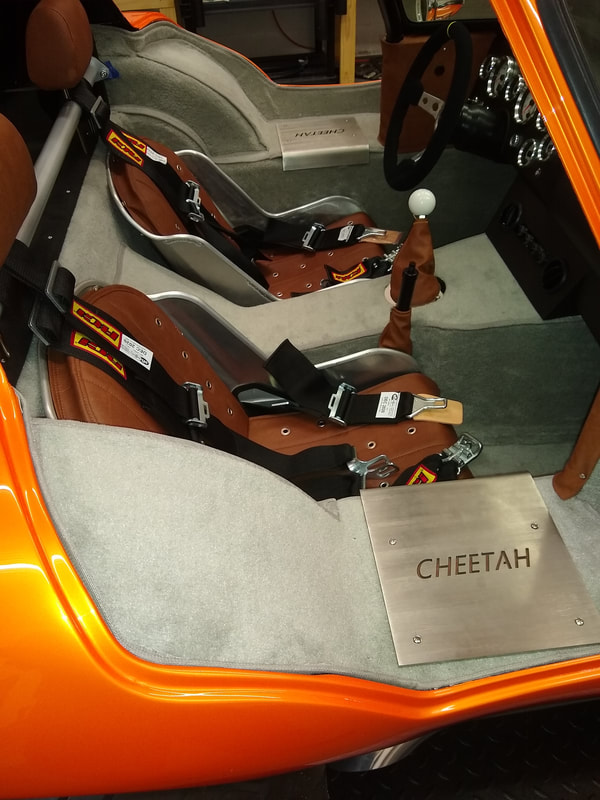
I had originally planned to have an upholstery shop do all the interior, but circumstances made me reconsider. In the end I had a small shop make seat cushions and headrest covers, and I decided to take on the rest of the job myself. Here is a photo of a seat done by the shop with a headrest, sun visor and shifter boot I finished in the same fabric.
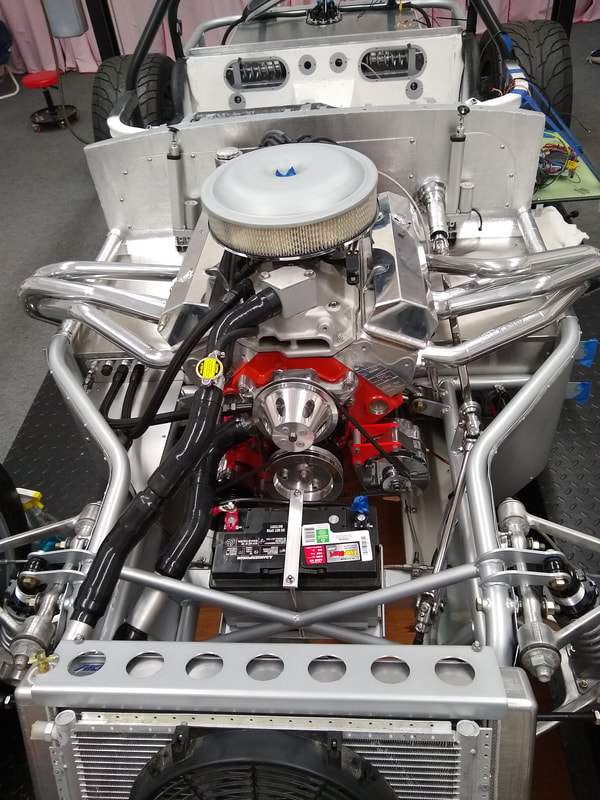
With the essential electrics done, I was almost ready to start the engine in the car for the first time. For that I added fluids, bled the brakes and clutch, installed heat shields on the foot boxes, and installed the headers and side pipes. Here's a photo at that stage.
I then rolled the car to out near the garage door, put some gas in the tank and fired it up. Here's a video of the second time it ran. https://www.youtube.com/watch?v=ie9Bin3R-n0
After setting the timing, confirming no leaks and seeing normal indications on all the gauges, I drove it back into the garage and onto the lift. It was a significant milestone in this project.
One thing my brief engine run revealed was that the exhaust was too loud. I had designed the side pipes so they could be easily opened to try different baffles inside. Over the next week I tried three more baffles before settling on one that yields about 76 db within ten feet of the car. I'll keep that one until I can try the car out on the road and in real traffic.
To complete the interior I had to install carpet. Because the shell of the cockpit was made from flat sheets of steel, there are many sharply angled places but very few with three dimensional curves like the surface of a ball. That meant I could install most of the carpet with contact cement in large flat pieces. In the one place where that was not feasible (the transmission tunnel), I glued carpet to each side and then topped it with a piece that had been bound to give the joint a finished look. I was able to install most of the carpet with the body off. The last pieces would have to wait until the body was in place. So I asked my good friends Bill and Robert to help me put the body and nose back on the chassis. That step went smoothly but again revealed the nose misalignment I had struggled with ever since I got the painted body back from Ohio. I eventually discovered three separate issues causing the problem After further cutting, welding and repainting of hardware, the car now looks like this.
With the nose and body in place, I could work on several more tasks. One of them was one I had been looking forward to for some time. The things that most make this engine look like the 1963 Corvette engine used in real Cheetahs are the valve covers. I had purchased some used finned aluminum Corvette valve covers at a car swap meet two years ago and modified them to provide a PCV system for this engine. All cleaned up and installed the engine now looks like this.

With the body in place I was able to finish up the interior. I had finished the dash and seats earlier, and had started on the carpet. To finish the carpet I had to cover parts of the body around the door openings and rear wheel tubs with a combination of carpet and the same fabric used for the seats. I then installed the seat belts, seat and trim pieces.
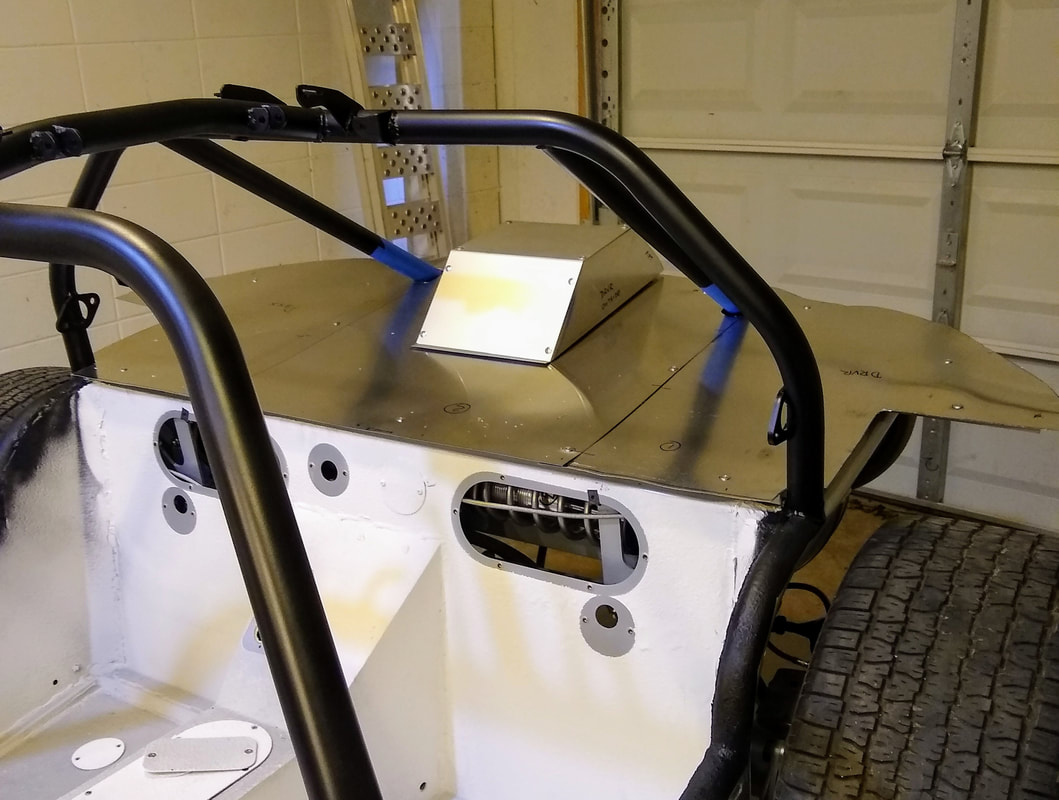
The last big part of the interior was the large panel I call the rear tray that covers the large open space behind the seats.I built a light weight structure of aluminum to support three large aluminum sheets that were custom fit to match the shape of the fiberglass body. I topped that with an aluminum box fit to cover the hose running from the fuel filler to the fuel tank. I insulated them on the bottom with adhesive sheets of butyl and reflective aluminum, and covered the top in foam backed black suede material. With all the interior components behind the seats in black, there is no glare on the rear window and that whole area virtually disappears.
The final major element of the interior was the step plates just inside the door opening. I had these custom made of thick stainless steel with the word CHEETAH cut out with a water jet. I finished them with a brushed finish as their purpose is to protect that areas should anyone need to step there while getting into or out of the car. This car is not easy to enter or exit. Here are photos showing the completed interior.
I was thinking the car was almost done when I noticed an oil leak at the back of the engine. I determined that one leak came from the intake manifold installed by the engine builder, and another came from the oil pan I had installed. I soon realized the best solution was to pull the engine, remove and reinstall the leaking components AND test run the engine on an engine stand before I reinstalled it. In retrospect I realize I should have planned to do this from the beginning, but I didn't because I didn't have an engine stand. So I built one mostly from components I already had in my shop.
During a subsequent test run I determined the rear main seal was also leaking. After replacing it there were no more apparent leaks, so I reassembled the drivetrain and reinstalled it into the car. See "The Saga of the Engine Builder" for more details.
With the engine compartment, wiring, plumbing and interior finished, the last major component to install was the rear window. Like the front windshield, it is secured by a Trim-Lock two-piece locking gasket. Someone else installed the front windshield but I decided to do the rear by myself. It would have been easier with an extra set of helping hands, but it worked out well.
The next step was driving the car carefully down my 600' driveway to the large parking lot of a nearby shopping area. The stores are mostly empty so there was plenty of room to do some low speed laps before heading home. During that brief outing I noted about ten more things that needed attention including areas where tires rubbed the body and an exhaust system that was obnoxiously loud. It took two days to resolve those issues. I then decided the car was sufficiently finished to submit my application for a title to the State of Alabama. It drives well enough for a brief visit with the inspector.
And here is a video of it running.
Mar 22, 2021
The Cheetah has a title and tag and has been on the road for about a hundred miles. I've shared it with family and will be sharing it at car gatherings beginning April 2021. As with previous car projects, I find something else to fix or change after every drive. For example, the exhaust is still too loud after seven previous muffler combinations. I'll keep playing with it until I get everything the way I like. That may take a while, but I'll be driving it along the way. So until something major pops up, I think I'm done posting here. I hope you enjoyed the visit and perhaps learned something you can use some day. - Tommy
The Cheetah has a title and tag and has been on the road for about a hundred miles. I've shared it with family and will be sharing it at car gatherings beginning April 2021. As with previous car projects, I find something else to fix or change after every drive. For example, the exhaust is still too loud after seven previous muffler combinations. I'll keep playing with it until I get everything the way I like. That may take a while, but I'll be driving it along the way. So until something major pops up, I think I'm done posting here. I hope you enjoyed the visit and perhaps learned something you can use some day. - Tommy
